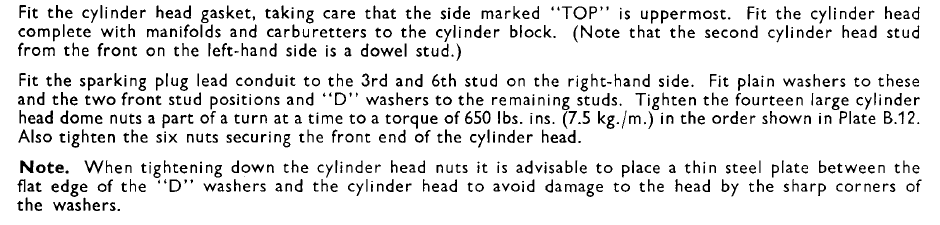
I have just refitted the head on to the engine block and torqued down the nuts. Refurbed head and new studs.
Reflecting on what I did, I think I may have made a little mistake. I fitted the dowelled stud second back on the right. It fitted in the head stud hole fine, but the head was a little tight on the studs. It appears to have torqued down OK. Checking the manual, it says the stud should go on the left. I haven’t finished the job yet and so I don’t know if the gasket is OK.
Is this going to be a problem? Should I remove the head, move the stud and fit an new gasket, or leave as is?
Dave…
Huge mistake, that you only make once…
You must remove the head and refit the Dowell stud in its correct location.
Also its most likely you have damaged the hole in the head where you forced the head down onto the Dowell stud, thus likely to have some deformation of the surface around the hole. This can be very carefully sanded down to be back to its originally smooth finish…
Otherwise, its most unlikely that the head is properly seated on the gasket/block, thus you will blow the gasket sooner or later after starting engine… And same problem if you don’t repair any deformation to the hole…
Just to be clear, the stud fitted the hole in the head easily when on the bench, so I don’t think there will be any damage. It was obvious that it wouldn’t fit in other stud holes. The head tightened down easily without much force.
Thank you for your replies.
I am a little annoyed with myself for fitting the stud in the wrong position. But also annoyed with Jaguar and Payen (or perhaps just Jaguar). Why does the stud fit in the second hole on the carb side and why did the gasket fit over the stud? Rhetorical questions really, just expressing my frustration. Making the gasket so it only fits when the studs are in the correct positions would be a great idea…
Anyway, a new gasket will be on order as soon as SNG Barrett open their phone lines.
The purpose of the dowel stud is to precisely locate the head in position on the block relative to the pistons and the sprocket on the crankshaft, so there will be no misalignment in the combustion chambers or chains.
The second hole from the front on the left may be reamed to a more precise tolerance than the others.
Assuming you do remove the head, check the underside stud holes to see if you do, in fact, only have one hole larger enough for the dowel stud. My C type 3.4 has 4 stud holes that are bored (or cast) for stud dowels, and that’s what I used…2 dowel studs to locate the head, plus 2 slightly larger (or smaller) dowel studs to locate the gasket…can’t remember exactly if locating the gasket properly required larger or smaller locating dowels.
I found it odd that Jag only used one dowel to locate the head since all American engines I know of used 2…a better approach, IMO.
I have removed the head now. Moved the stud to the exhaust side and refitted. It came off easily and there was no damage to anything. The head face and block deck were flat, the gasket, crushed as it should have been.
Refitting was the same as when fitted with the stud in the inlet side. The stud fitted I the hole in the head exactly the same on both inlet and exhaust sides.
Just got to fit the exhaust, carb and throttle linkage, heater (looking forward to that) and cooling hoses and she will be ready to go.
Can’t wait, but unfortunately, there is a lot of salt on the roads here and no rain forecast for some time.
You’re lucky; I did the exact same thing, first ever engine rebuild and it was on an XK engine. No mention in my manual about dowel studs, assembled wrong and later discovered I had a bent valve. Could not remove the head; had the entire car suspended from the garage roof whilst bashing on the stuck stud. Took about 8 hrs banging to get the head free. As mentioned, you only make that mistake once! In my defence, I was 18 at the time.
Dave, A good result, well done - as I said earlier, its a mistake you only make once…
But I remain surprised that the dowel stud actually fitted easily in a non-dowel hole in your head… ???
Are they original studs or reproductions???, as it sounds like the dowel is undersize…
Probably no big deal, as whole intent of design is for one accurately position stud and cylinder head precision machined hole to suit, on basis that the relative clearance of the distant non dowel studs and non precision holes is sufficient to suitably align head properly on block…
Head gaskets are simply there to seal properly all the mating water and oil holes, and combustion chamber, and are not all that precise in hole size…
But I bet you never make this mistake a second time - I haven’t, I learnt from the first time…
And be careful, there is another potential 101 mistake often made - but only an issue if you deck the block - be warned…
Hi Roger,
I have used SNG Barrett studs. I assume they are standard spec.
The dowelled stud fitted both inlet and exhaust side, second hole back, in the head with the same clearance - just a little movement.
Neither time did the head slot on to the studs all the way down to the block without a little bit of persuasion. Gently tightening the nuts was all that was needed.
I did notice that the thread on the second hole back on the exhaust side had been helicoiled, so I am hoping it was drilled accurately. It worked well before I took the head off, so it must be acceptable.
Yep, those two or three stamped letters on the left hand side mean the cover and block are a matched pair and were decked together top and bottom at the factory.
See Kevin’s response - got it in one!
Again a mistake you only make once, or better still read-up/prepare before tackling major jobs that you haven’t done before… XK engines are very well known, so should be no surprises, as there is nothing with these engines now that isn’t well known regarding repairs and maintenance, and indeed major overhaul…
The head is on and cams timed. That was a tricky job, the centre plates were very sticky in the cam gears.
I have another issue that I am confused about.
The cam covers are a very snug fit. I am sure they fitted better before the head was reconditioned. The studs are a few millimetres too far apart, or the cam covers have shrunk a few millimetres.
The car is in a heated garage (about 12 degrees Celsius) and the cam covers were in the unheated garage (possibly about 8 Celsius). I can’t see that is an issue. However I have left the covers balanced on the top of the engine for the night.
Any hints on what may be the issue.
I don’t think you mean millimeters, that would be a big discrepancy, perhaps you mean mils. The studs may have got bent. It happens with careless handling, the 1/4" part of the stud is a lot weaker than the 5/16" part, and it would tend to bend at the point where the diameter changes.
Dave, as Robs comment - surely mils and not too many mm, but these studs are easily bent but therefore can be easily re-bent straight - BY HAND - in situ. Place cam-cover on top of studs, and note which particular studs are not central in matching hole, noting direction/amount you need to rebend - BY HAND. With the cam-bearing caps in place, you will simply be re-bending just the 1/4" diameter threaded part…
But another trap for inexperienced rebuilders - make sure all your copper washers are in good condition, and if you buy new ones, make sure you get THICK copper washers as original, and not the far more readily available thin copper washers, and when you tighten down the dome nuts, don’t overtighten being aware the cam cover is unsupported under the dome nut, so easily cracked if dome nut is overtightened. Many people try to fix an oil weap through the stud hole, by just tightening further the dome nut - not a good idea.
I am loath to advise my best solution to ensuring no cam cover leaks - I use silastic sealant, but very very carefully/sparingly - as excessive silastic can cause issues if excess gets inside the camcovers.
So with the cam cover sitting down fully over all the now centralised studs, I squeeze a 1/8in drop only of silastic into the edge gap of a stud against the cam cover hole. I then place copper washer down and rotate it 360-degrees spreading the drop of silastic fully around the stud so fills the thread and cam cover gap at that point. Then as above, fit and carefully tighten all the dome nuts. I dont have a torque reading, just am used of doing it by feel. But done carefully/properly - you will have no leaks…