As the title says, I’m working on installing the Mobeck EFI kit. I’m excited for the results at the end of the project, but as this is a lot of work, and I’m also doing a radiator and electric fan upgrade at the same time, I thought I’d make a thread here to post progress and ask questions.
My car is a 1988 Jaguar XJ-S V12 HE, but it’s not exactly as it left the factory. A few years before I took ownership of it, the previous owner had the engine swapped with a slightly later V12 (from the Marelli years), but brought over the original engine’s Lucas EFI system. So my engine bay’s wiring looks a little rough and there are at least a couple of relays that I suspect are in a different location from where they were originally.
From what I understand, the swap was done as a last ditch effort to address overheating issues. Based on what I found as I dug into the ignition system last year, I wouldn’t be surprised if the overheating was due at least in part to neither form of ignition advance working as they should (vacuum advance was dead and centrifugal advance was seized). On top of this, the AAV was also stuck open (I think), so the previous owner’s mechanic seems to have just set the timing so that it would have a normal idle.
Rather than fix all these problems individually with parts that are expensive, hard to find, or inherently troublesome, I decided to just bite the bullet and get the Mobeck EFI kit. I view it as giving the engine a solid base of reliability and greater flexibility with future modifications (exhaust and manual transmission swap are longer-term goals for this car, for example).
So that’s the background for the project. Now for some questions I have…
The Mobeck kit instructions say “remove the complete engine harness at its connectors,” and I just want to make 100% sure I’m doing the right things here. As I mentioned, the wiring in my car is not 100% as it would have been from the factory due to the engine swap, and there are a couple of relays that were mounted just in front of the A/C compressor that I’m not sure about. The wiring comes from the cloth-wrapped harness going back toward the firewall, and then two wires come from the relays and go forward to the injectors. I know that whole harness is supposed to come out, but what do these relays do, and do I need either of them or any of the wiring to remain attached?
I’m taking this opportunity to upgrade the radiator and replace the belt-driven fan with dual electric fans. Right now I’m looking at the middle kit from Wizard Cooling (5 1/2" critical thickness option), because while I’d love to go with that brushless option, it’s just too pricy. The kit I’m looking at comes with the aluminum radiator and two 13" Spal fans. It’s still fairly pricy though at $1239. I feel it could be worth it though to help keep the engine cool and eliminate the belt-driven fan. I’m hesitant about trying to save money by keeping the stock radiator when this is as good a time as any to upgrade. Is there anything else I should consider before pulling the trigger?
As part of the EFI upgrade, I’m also removing the US-spec air pump/air injection system, and because of the fan upgrade, I figure I’ll get a GM CS130 alternator to put in the air pump’s spot and take one more belt off the engine in the process. Anything I should look out for either in regards to blanking off the air injection system or in terms of wiring for the upgraded alternator? I’ve read the Kirby Palm book sections on this, but I know that was last updated in 2009 and wondered if there was any new thoughts on these.
Lastly, I’ve seen people with refinished fuel rails and I’m not sure where to get that sort of thing done or how to inquire about it. Mine doesn’t look bad, but considering I’m stripping it down for this already, it seems like a good time to make it prettier.
Thanks for taking the time to read! I’ll try to post back as I get further into things. The next things I’m doing are taking the radiator out, getting the last two belts off, taking the intake manifolds off, etc.
Very nice project. I applaud the Wizard Cooling decision. I replaced my radiator with one of their aluminum rads. Excellent fit. In hindsight, kinda wished I had bought the double electric fans as well. Oh well, there is always the future :-).
Regarding fuel rail, I had mine done by S. David Faircloth at jaguarfuelinjectorservice.com in conjunction with having my injectors cleaned and “balanced”.
I will be following with interest as the Mobeck system seems well done and definitely is more modern technology. Hopefully economy and performance gains justify the expense, as my Lucas system is fine (of course, that could change at any moment).
Not sure why there would be any changes to the Lucas wiring for a later Marelli engine as the only difference is the ignition system so they would only have needed to swap in the old Lucas distributer in place of the Marelli. The engine itself is exactly the same unless it came out of a '92 or later where there was an improvement in the intake manifold interior core size (slightly larger) as well as a much better fuel injection rail using the more standard O-rings and no short jumper hoses. Personally I have rebuilt the stock distributer using a modified generic chevy vacuum advance module with good success, as well as changing out the thermostatic bulb on the AAV. That being said, the Marelli ignition is far better than the Lucas having a digital advance curve that is far more efficient that the older mechanical one. Having driven both ignition types on the 5.3L, there is a big difference in performance. Of course the Marelli is a premium fuel car as a result whereas the Lucas runs on mid-grade or even regular without any trouble.
The factory cooling is just sufficient when well maintained only, otherwise one is looking for trouble. Eliminating the mechanical fan in favor of a good electric one is good even with the stock radiator. The factory electric fan is supposed to run for a set time after shutdown to help eliminate the possibility of dropping a valve seat due to heat soak. So, kept within spec the factory stuff works but is not always ideal for those not familiar with the nuances of owning the V12.
Good points all around. I’ve never driven a Marelli car, only two HEs, but the idea of the Marelli system does seem superior to the Lucas one. But it’s nice not to have to worry about the eccentricities of either system with this upgrade.
And you’re right, the wiring shouldn’t be different. What I meant by that was that in the process of doing the swap, it seems that the wiring was put back in a way that doesn’t seem factory-spec. It looked different than what I could find references for online. As an example, last year when I was doing spark plugs and wires I noticed that the fuel injectors were wired backwards (A side wiring on the B side and vice versa). I got mixed opinions from people as to whether the car would even run like that, but it did! I reversed the wiring and put it all back together and it ran like that too. Maybe slightly better, but the difference wasn’t much. So yeah, just some improper assembly oddities there. But I did figure out the wiring that I was looking at tonight and it looks like I won’t be needing any of it with the upgrade.
Sounds like the consensus is that I should go ahead and upgrade the radiator while I’m at it. Will likely go ahead and order the Wizard Cooling kit soon.
I believed I figured out the wiring in point 1, but I’m still working out all the stuff that can come out. For example, I’m now looking at this wiring bundle below (the one with the candy cane-like red and white wire that goes from the lower left, over to the right, and then up to the top middle) and thinking maybe that whole thing comes out? Seems like it does, and I do hope so since it’s one of the more unsightly bundles under the hood.
The reason that the car ran even when the injectors were wired backwards is that they are speed density batch fired systems, so only a few of the cylinders actually receive injector timing. Synchronous injection really is only of value at or near idle, through the rest of the RPM range it makes no difference. Mainly it helps with emissions. I’ve seen where some have used Megasquirt systems to replace the Lucas or Marelli and achieve synchronous injection.
That was what I gathered from doing some research and asking around, which is why despite some naysayers, I reversed the wiring back to the way it should be and everything was fine even though the car ran before. It was just an interesting moment because I was like 95% sure I understood it correctly, but that 5% in the back of my mind made me a bit nervous, haha.
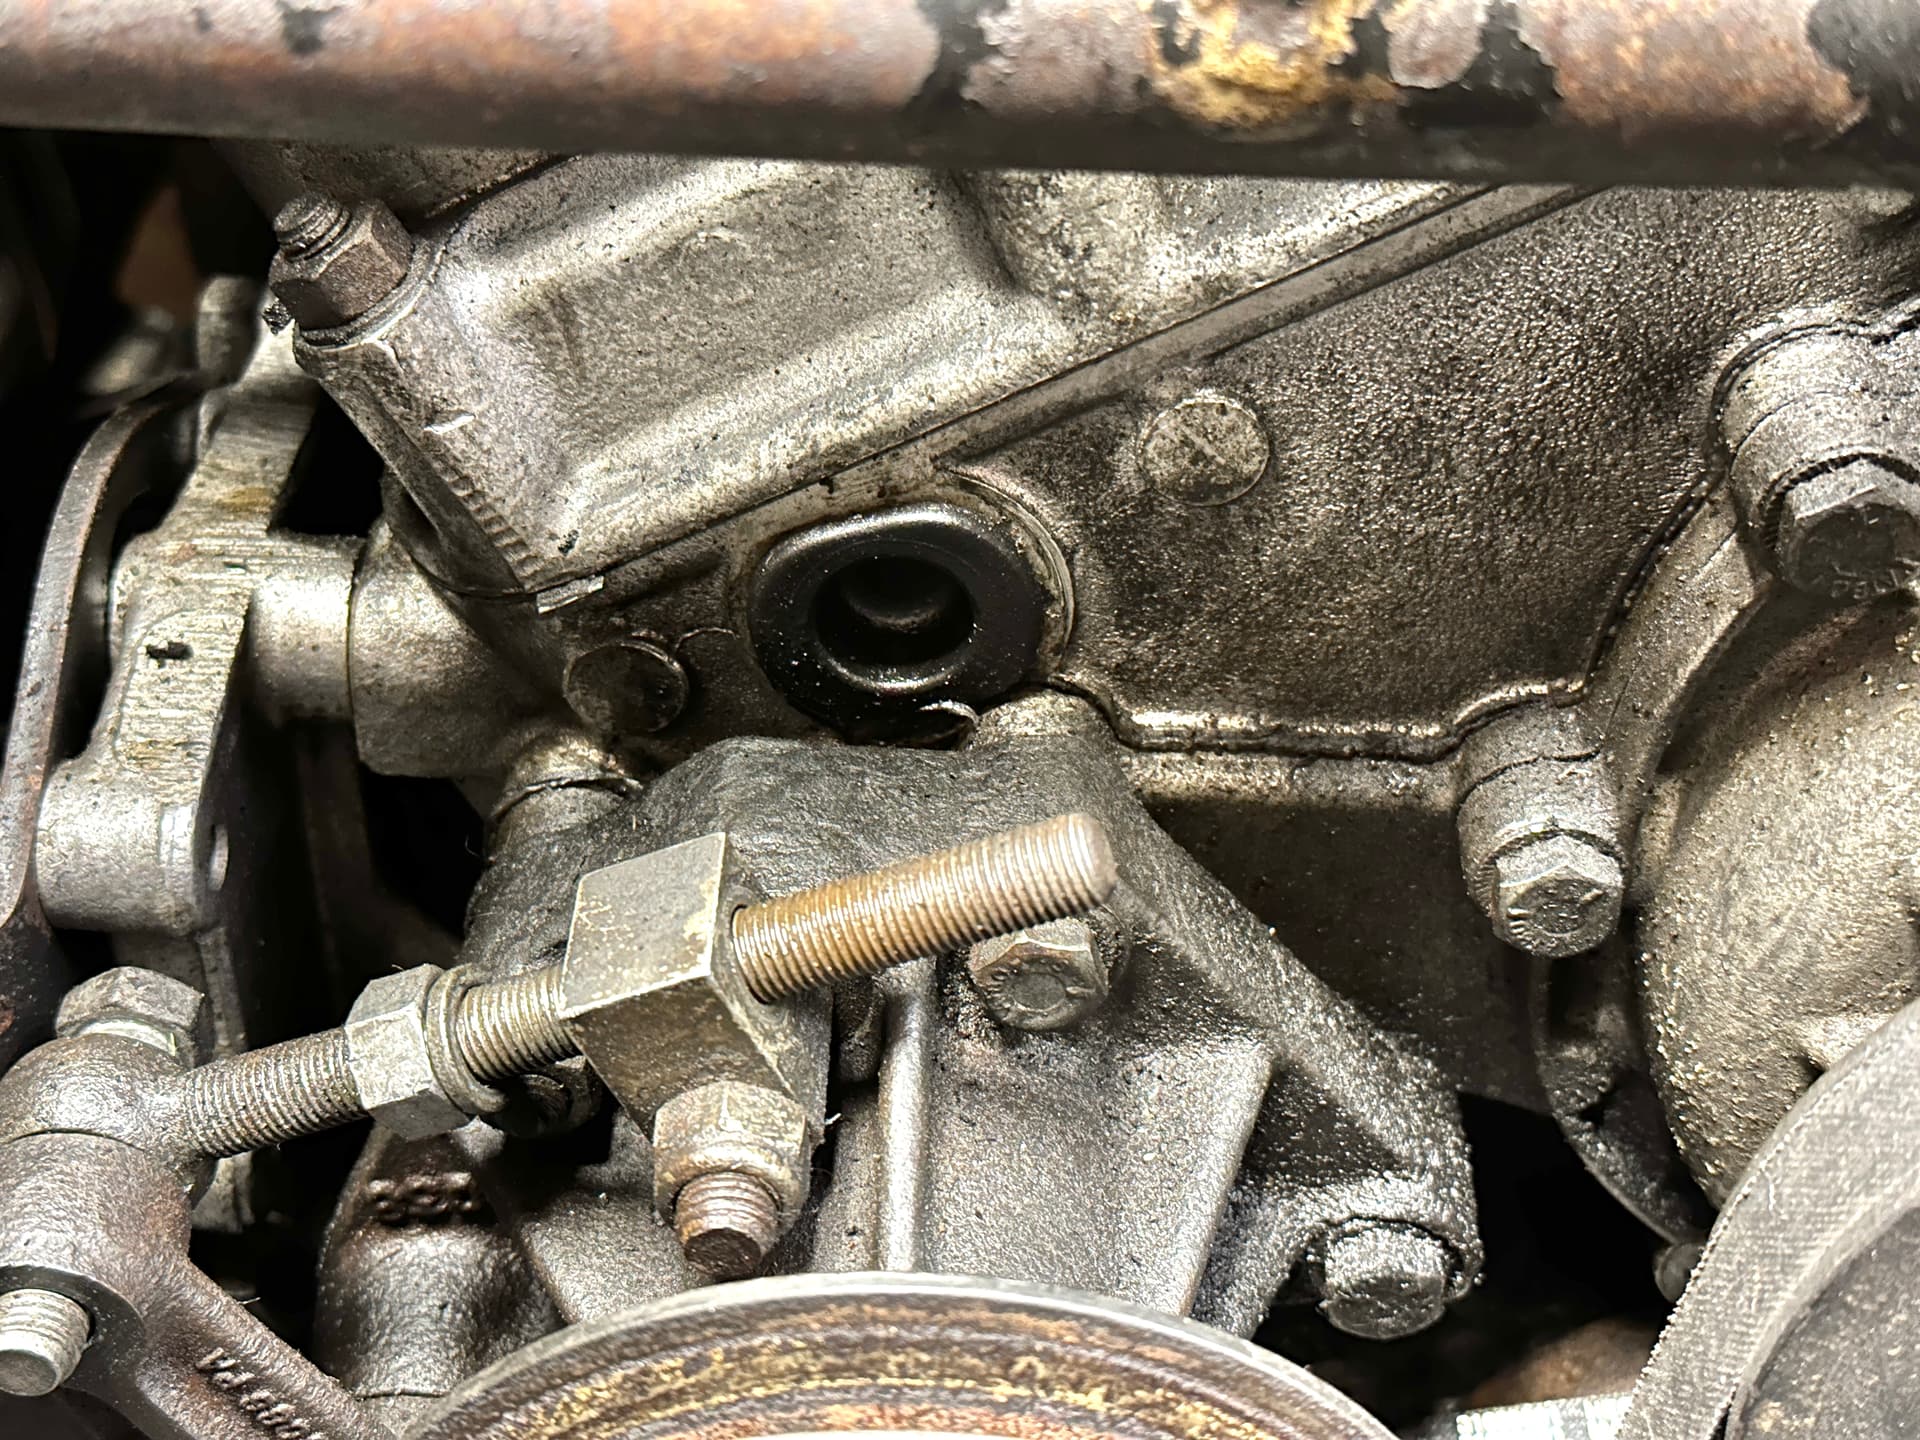
Just to feel accomplished, I added my first new part (in this project) by replacing the rubber timing chain cover plug with an aluminum one from jag-improver on ebay. Getting the rubber plug out was difficult as others have noted due to it being hard and crumbly. I ended up using a couple of little picks jammed into the rubber to hold it in place with one hand while I carefully drilled a small hole through the center of the plug. Then I shoved a right-angle pick through the whole and pulled the whole thing out. Took a while to get a good enough hold to overcome the hardened rubber holding it in, but it eventually came out.
Installation of the aluminum plug couldn’t be easier. Clean up the opening in the timing chain cover, and then set the new aluminum plug in place and tighten the screw. This pulls the back half of the piece forward, clamping the o-ring in place and expanding it outward to grip the hole. Feels like it should be enough force to hold it in place and leak-free for a long time to come, and the only thing that might ever need replaced is the o-ring. Easier than a fried rubber plug.
And then I got the injector harness out. I know I have to put a new harness in eventually, but it feels so good to get this eyesore out of the engine bay.
Now onto my question. The Mobeck kit instructions say to remove the engine harness, and I believe that’s what I’ve done by removing the injector harness. Now I’m looking at the two wiring harnesses that run from the rear-right side of the engine bay across the back of the engine. The one with segments of exposed wires in the photo below seems to mainly go to the throttle position sensor and seems like it could come out. The other harness looks like it goes to the kickdown switch and a few other things, and I’m guessing that does not come out. Anybody know if these assumptions are correct?
Does the Mobeck kit come with new TP sensor wiring? Not knowing much about their kit I would think that it should be left in place. Hadn’t seen one of those plugs before that you replaced, looks really good. I’ll have to look into it myself. I know that Mobeck makes some good stuff for the Jags, only wish I could afford their prices. Really would like their camshafts.
Mobeck’s stuff looks just as awesome in person as it does online. Maybe better! The camshafts are droolworthy.
The Mobeck kit does come with new TP sensor wiring, but it actually doesn’t use the TP sensor (or a different one) at all! From the instruction manual:
“In this kit I have prepared the connection of an throttle position sensor, but I don’t use it. My experience with tps sensors, both old and new from Lucas is that they don’t work very well and only mess up the enrichment system. If in the future Lucan can make a good tps sensor we can connect it and then you have the three wires in the harness as you can see. In this kit I use manifold vacuum as load signal and it works pretty well on these heavy auto cars, if you have an manual conversion or tuning parts in your engine you can alter the enrichment in the ecu map.”
it is : john_john1 is the man behind Jag improver
he makes nice (and useful) parts, and was very helpful when I ordered a good part of them (half moons, banjo bolts, timing chain cover plug, radiator bleeder, AAV rebuild kit)
the mobek kit looks a valid option when you’re in the same situation as NinetyQ, rather than try and figure out what has been done (badly) by PO
The fuel side of the engine management system on Lucas cars has:
Injectors
Air Temp sensor
Coolant Temp sensor
TPS
Main relay
Fuel Pump relay
45 sec timer to boost idle on startup via the Extra Air Valve
Then it’s all the Ignition related stuff.
I see that you removed the Extra Air Valve?
You will need it also for idle bost for the AC.
I remember in Kirby Palms book that he had a part number for a hall effect sensor that was a direct replacement for the Lucas TPS, thus getting rid of the resistive wiper that gets dead spots in it.
From the pic it’s hard to see the exact wire colors but those, I think, are the idle relay and idle override relay. They functioned on/with the extra air valve circuit, solenoid valve circuit, 45 second timer, A/C compressor circuit.
You don’t need them for the the engine to run. Whether they’re of any use with your new F.I. it, I can’t say.
“Complete engine harness” is a little vague.
I suspect what is meant here is anything specifically fuel injectors and distributor and ignition should be removed. Not every wire that goes to, or is attached to, the engine.
You have wires for the idle relays, 45 second timer, enrichment switch, Extra Air Valve, cruise control, cooling fan, and on and on.
Personally, I’d move ahead a bit further before removing too much
That looks like the starter relay…which also plays a role in some of the fuel injection circuits.
I would be reluctant to remove it (or the big bundle of wires) at this point unless the kit provides a new alternative
Some of the responses above had me doubting my understanding of the kit, so I figured it was as good a time as any to lay out the wiring harness and other parts to really work out exactly what the kit will be replacing. So here is the harness. I’ll identify the parts below:
3 connectors left-to-right: Engine ground, ignition, and tachometer
Lambda (O2) sensor connection
Throttle position sensor (optional)
Coilpack connectors 1 and 2
Injector connectors
And then in the picture below, you can see (clockwise from top) the new ECU and vacuum tubing, AAV blanking plate, crankshaft trigger wheel, crankshaft sensor, electronic idle valve, and lambda sensor. The only things not pictured in either photo are the coil packs and injectors.
@Aristides: this new idle valve takes the place of the air valve I removed. That valve was also connected to the harness I am definitely supposed to remove, so I was pretty sure it had to go anyway.
@PanzerKat: the hall effect sensor would be nice if there was a known working example, but I don’t want to experiment with it myself when the vacuum load programming seems to work well.
I think your approach is approaching analysis paralysis.
You need to start installing things and stop removing things that aren’t directly stopping you from installing things. It’s time to hit the go button. The weekend is almost over and this is a weekend project.
Mobek has a Youtube video and claims there are only two electrical connections to OEM. 12V and ground.