Hi, have removed the King pins and am awaiting a set coming from Worcester Classics I understand best practice is to press the king pins in, is there a tool people have used for this ? bearing puller inverted or something? additionally what is the best method for replacing the King pin bushes, I have checked the axle beam eyes and there is a very slight amount of play about three thousands, any suggestion for pressing in the king pins and buses are most welcome
Thanks
Mike
The axle eyes are quite important. They become oval with wear and should be bushed to accept the king pins without any slop. 3 thou sounds quite a lot as this becomes magnified in terms of slop at the ends of the pin.
Peter
You can draw the bushes into the steering knuckle by making up a simple puller. Use a short length of threaded rod, say of 12mm/1/2", fit two washers and nuts. Insert the rod through one eye with a nut and washer on the inner end. Feed the bush over the top and align it with the hole in the eye and fit the other washer and nut. Oil the hole in the eye liberally and the side of the bush and start winding carefully. Check the straightness constantly to make sure it is pulling in square.
The Achilles heel here is that you will need an adjustable reamer to ream the bushes to a firm snug fit for the diameter of the king pin. The reamer needs to be long enough to ream through both bushes in the one direction.
Since the eye of the axle beam needs to be bushed, it will be a workshop job as the eye needs to be bored accurately to make sure there is no error in the castor and camber angles. It will be a steel bush and will have to be reamed also for a tight fit for the king pin. The fit of the cotter pin and thrust washer is also important.
If you don’t have access to this equipment and expertise, I would suggest you give the lot to an experienced axle workshop to fit and assemble.
Thanks Both
I will check the axle eyes again I used a telescoping gauge and a calliper to measure the wear on the eyes, however when I put the old king pins back in the eyes they are very tight so I will measure again to satisfy myself they require busing then it will be an axle out job
I will also trial fit the new king pins in the axle eyes when they arrive also
As for the king pin buses is there a trick to getting the old ones out ? or just make a puller with a socket or drift on the end ?
Thanks Mike
I just used a vice and suitably sized socket to press my old king pin bushes out.
Peter
Yes, wait to check the eyes with the new pins. If it is a tight fit, you don’t need to touch the axle beam. The reason the axle eyes become oversized is if the cotter pin was not tight enough, and if the car has endured a lot of harsh braking over a long time, as in competition use. The braking torque is huge and this can twist the king pin forward.
The bushes are bronze and are sacrificial and often the pin has little wear. You can draw the bushes out using the installation method I described above, ie a length of threaded rod, long enough to pass through both ends of the knuckle. You will need a washer that is very close to the id of the knuckle hole (ie the bush od), and as thick or heavy duty as you can find.This is because it needs to pass through the knuckle as the bush slides out. If the washer bends under the load, pack a few layers of washers on top to reinforce it.
If the bush doesn’t want to release easily, tap the end of the rod after you’ve tensioned it up. There are brute force and ignorance methods of hammering them out if you prefer, as they are only scrap, but you don’t want to damage the bore.
Do a dry assembly first of just the knuckle onto the axle and fit the new thrust washer to check for any clearance problems. Ideally there should be no clearance but still easy fitting. If there is too much clearance, this can be addressed by adding a shim washer, which you may have to make.
Note 1: the thrust washer is on the bottom, and shims ( if needed) are on the top. The underside of the axle eye and the matching face of the knuckle should be carefully smoothed as these are the wearing surfaces for the thrust washer.
Note 2: make sure the lubrication holes are clean and clear all through, and grease everything on assembly. Don’t forget to drill the oil holes through the new bushes. Check that the bushes don’t extend into the space for the axle.
It was usual in those ‘good-ol-days’ to lubricate these parts, and shackles, with heavy oil - 90, 140, etc. When later owners took over the maintenance, they usually resorted to conventional grease which often blocked the small holes and nothing got through.
Thanks Guys
I will report on my progress in the next couple of weeks
Mike
The Coventry Foundation has the original Factory tool for replacing the Kingpins. Free to borrow for JCNA members and Foundation Patrons. No use reinventing the wheel.

1 Like
That’s great forgot about this service how do I go about borrowing it ?
Mike
Thanks
I think I am am a member as I have bought some parts of their eBay shop so I will try to log in and borrow the tool
Much appreciated
Mike
Well, the King pin bushes have caused me some frustration, I removed the old ones and inserted the news ones with a g clamp type of tool for pressing out ball joint and other U joints the tool worked very well. then I bought a adjustable reamer with a long pilot to ream out the new bushings, what a disaster ! I researched how to do it and took my time, this tool has adjustable blades and a guide that fits into the bottom bushing whilst you ream the top bushing so that they are in line with each other, I took my time and finally adjusted the blades so the king pin went into the top bushing with minimal clearance, however when the top went in it would not go any further ? I thought is the top of the King pin tapered ? I got some V blocks and A dial gauge and confirmed they were concentric, I thought, hey, how I will order some more bushes and have another go as I must have done something wrong, Nope, same scenario on the second try and I was more careful to make sure I was taking very little off at a time, I have found a machine shop that will ream them for me , not sure what I am doing wrong, any ideas ?
Thanks
Mike
I did this job once on a 1953 Chevy truck. The reaming tool was not adjustable.
Maybe if we had a picture of your reaming tool we could understand.
Do you mean it went in the first bush but stalled when trying to enter the second? Does it do this from both sides? If so, did you ream it through from the other side as well?
If the pilot end was not central in the lower bush, then the two bushes will not have parallel bores.
OK I feel like I am taking over this forum all by myself sometimes, however that’s what its for right ? to share information, and I have certainly learnt a lot from it
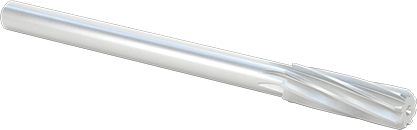
OK the reamer, this is a king pin reamer which has a long stem on it so it goes through the top bush and then there is a tapered guide that slides onto the reamer shaft that is inserted into the bottom bush, this keeps both the bottom bush and the top bush in the same axis.
So far so good, I then set the blades on the reamer to just under the bush size, to establish my stating point, then incrementally adjust the blades to cut around half a thou to 1 thou at the most, and kept trying the king pin every time I took a cut, once I had the king pin to a tight fit at the top of the hole I pushed it in further and found it to be a loose fit!
tried this twice with the same result, so I was scratching my head on this one
there should be a simple answer to this but I cannot think what it is
See pics of reamer, on its side to show I went straight through the bush with the reamer blades


It’s ok to “takeover the forum”, happens all the time when we come up with an interesting problem to discuss.
I don’t quite see how you can be sure the blades remain parallel with your tool.
This is the kind of reamer I used.
Don’t be concerned about perpetuating a conversational thread. Some subjects are addressed with one reply, others with dozens. One consideration is that the information revealed in many of these topics might be ‘old hat’ to some but very worthwhile to others who have yet to tackle a similar task.
The extension on your reamer does not centre in the other bore as it has no guide to run in. Knowing this, when I come to do mine, I’ll keep the old bush in until the new is reamed and wrap the shaft to bring it up to the right diameter. I’m sure the machine shop professionals would make, or have, a simple plug as a guide.
If by the looseness, if it is minute, I wouldn’t be concerned until the second one is done. Then check what the total play is. Just one hint I devised when I replaced the bushes in the steering box - because the reamer cutters (new reamer) are very sharp, I considered it would be easy to take a bit too much out on the final cut. To avoid this, when I got the shaft to fit tightly and jam, I used the reamer in the reverse direction as this scrapes microns only at a time. Worked beautifully.
That should have worked fine, I have used those reamers before to good effect. Before use I dismantle them and ensure that all the grooves the blades fit in are spotless. This ensures all blades are the same depth and cut equally. As the whole assembly is on a a single shaft theoretically it should all line up, problem comes when the bushes you want to ream out aren’t lined up well enough and the shaft can bend slightly which leads to misalignment.
Thanks for the input, there is a guide for the bottom bush it’s just not in the pics, as Kendoo says it should have worked fine, not sure what I am doing wrong however with the cost of shipping bushes from the UK I will leave it to a machine shop to get this done, trouble is, there hard to find around here, that’s why I had a go myself, maybe I will figure out what I was doing wrong in some Ulrika! moment in the middle of the night !
OH just seen the guide is in the pictures 1st one and second