I am starting a new thread after the many twists and turns of identifying the root cause of a creeping overheat condition. The car has both a sludge/obstruction issue in the cooling system and there is substantial damage in the thermostatic switch tee due to electrolysis. The journey to this point was described in this thread:
Last entry and identification of the issues
=====================
I started to pull the radiator out last night and didn’t get far before I found what the issue was - actually two issues:
The main overheating root cause is a complete blockage in the hose from the header tank to the thermostatic switch tee. Michael - you were right!
There is green sludge present in the system. It looks like there was an intermixing of two coolant types that precipitated the sludge. I think heating the engine accelerated this. I had not touched the radiator before this issue started occurring so the PO must have done this before he sold me the car.
I think the location of the sludge is at the coldest area of the coolant. My hope is the engine will be less affected but that will have to wait until the water pump is pulled and the engine is flushed.
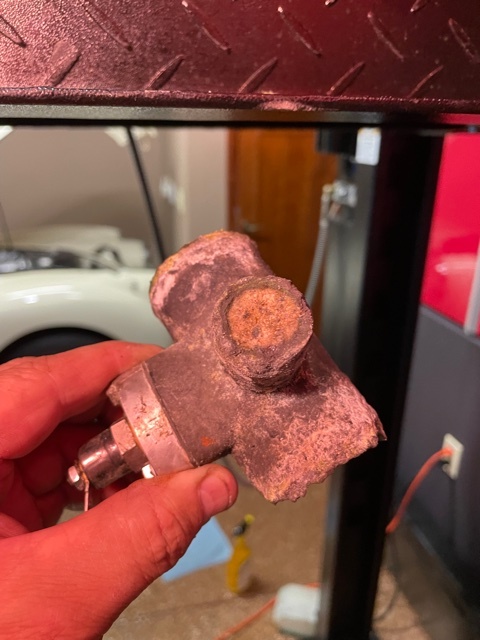
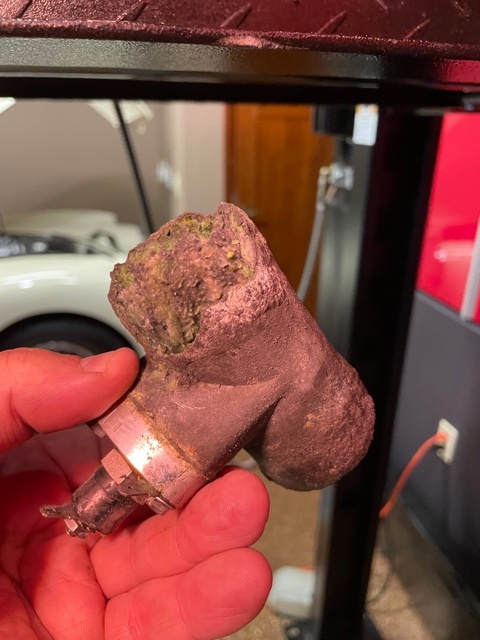
The second issue is that during the restoration for this car, the issue of possible electrolysis and subsequent damage to the radiator and other parts were not considered. If you look at the tee along with the replacement part I had recently purchased (I had planned to replace it during the radiator install), you can see the horrible state of this unit along with the lower radiator outlet. Both show severe erosion and would have failed/leaked soon.
At this point, it is clear that a major amount of redress and flush is needed.
I think this thread has arrived at the conclusion which is the identification of the root overheating issue as well as recognizing that the car has electrolysis part erosion that requires corrective work. I will start another thread on the journey to get this car back on the road. I will add the link to this thread when I start it within a few days.
Thanks to all for your invaluable input that has helped get this issue identified. I think it may help others seeing this kind of creeping overheat condition.
I think looking back, the easiest way to see if this is the issue is to pull the thermostatic tee out and inspect for sludge and obstructions.
=========
I will list the areas that will be addressed and (hopefully) fully fixed in the next post in 1-2 days. Comments and suggestions welcome.
When you said that refilling the system was very slow it was clear that there was a blockage somewhere. When I refill mine a gallon at a time and coolant and water goes iin as fast as you can pour without spilling. Glad you located the problem.
Oh… and…
If you are still having a problem, I’ve seen cases where the impellor of the pump is so worn out that there are no blades to pump the water. So keep that in mind.
LLoyd
“Abstainer” A weak person who yields to the temptation of denying himself a pleasure.
Writer Ambrose Bierce
The blockage of the header tank path would explain the slow fill, but that’s not going to be the end of the bad news, I’m afraid. If you cut open your radiator’s lower tank, you’ll find that the tubes are obstructed with the same crud.
The reason this happened is that someone was using an anti-freeze which had a high-silicate anti corrosion package, but not observing maintenance schedules. If the coolant wasn’t changed every two years, the silicate would slowly fall out of solution, and collect in the coolant passages. If it’s left in long enough, the solution gradually becomes acidic and you can see the result. The concretions sometimes form when crap like this is flushed, as it makes the deposits mobile and they tend to collect in the lowest and coolest areas.
You’ll have to toss the radiator, as well as the lower hose connection. That should be the worst of it, and you already have the new parts. You may also have deposits the engine water passages, let’s hope that’s not too bad But if it was my car, I’d be inclined to pull the pump to do a little more inspection.You should flush the system with citric acid, which is available from Mercedes specialists. What I would suggest is to do the flush without the radiator installed. Clamp the lower hose, and mix the flush into a few gallons of very hot water. Then fill the engine through the top hoses, thermostats removed. Let it sit for the specified time, then unclamp the lower hose and let the flush go right into your container. Finally, stick a hose in the top hose and let it run a long time. This will avoid flushing more crud into your new radiator. The problem you need to avoid is that you will be freeing up more debris every time you flush, and this would end up being “filtered” by the radiator tubes, causing them to permanently clog. Finally, no matter how clear you think the fluid is, if you don’t install a pair of Gano or Tebfa filters, you’ll be replacing the radiator again before too long.
When you refill, use a low silicate-HOAT antifreeze, like Zerex G05 or G40. .
Thanks for the great info. It is invaluable since it shows me the way on areas i wasn’t too sure about like how to flush and which antifreeze to use after all this is repaired. I added a coolant filter to my list based on this. Makes sense.
For anybody interested, this is the car that is being worked on - purchased through BAT in May '21:
I have developed a plan of action on the repairs. First I have ordered some accessories to support the repairs:
Support equipment
The Airlift coolant vac test & refill to make sure there is no air pockets once the system is able to be refilled.
A shop air compressor for (1) and I am sure can be used to help with the flush and cleanup.
A wet/dry vac to pick up the messes I am sure will happen during the many flushes and work.
A garden hose filter and sediment trap to help keep junk from entering the cooling system. i intend to use distilled water for the last flushes and the coolant dilution but I think I’ll need more water for general cleanup.
Chemicals
Citric acid from Mercedes as per Michael’s suggestion. Just ordered 3 x 1.1 lbs of the stuff. Wasn’t sure how much I needed but I think I’ll have plenty for a while…
Zerex G05 or G40 coolant
New Parts:
Retest the new thermostats and drill 3/32" holes to aid air pocket release.
Remove water pump & inspect. Clean area behind pump in engine if possible (maybe some flush but this seems to be too messy). Clean water pump. If OK, reinstall with gasket & with new elbow/heater & gasket. If the pump looks funky, get & install new pump…
Perform flush on the engine using old hoses/pipes. Not sure how many times, procedures etc. but will generally follow Michael’s suggestions.
Once engine is clean, install new header tank & all new pipes/hoses
Re-install thermostats & new housings, water temp sender
Install water pump/alt & PS belts
Build & install thermostatic switch assembly
Install radiator & cooling fan assembly
Install coolant filters just before radiator inlets
Use RD grounding kit to ground key areas, especially the thermostatic tee, motor, & radiator. I think the issue was the tee. It was connected to the switch ground which was a long wire than could have caused a ground loop.
So this is the plan. Comments welcome. My biggest unknown is the flush. This may require a lot of repeats. My hope is that it will show a good conclusion.
A couple more thoughts: with the citric acid flush, it’s probably better to go half strength on the mixture. Reason being that there may be some weak spots in the system which could opennn be up while flushing.
If you recover your DI water, you’re just going to be filling with very dirty water. Don’t go cheap on the fill.
Check your heater core by disconnecting both hoses, and then attaching a garden hose. Remember that deposits will accumulate in cool areas, because silicates are more soluble in hot water. You can check the bulkhead tubes the same way.
I don’t know what the RD grounding kit is, but I don’t like the sound of it. No part of the radiator or junction tube should be grounded, but an extra engine body ground is fine. Galvanic corrosion results from dissimilar metals in contact with an electrolyte and an electrical path in common. If you don’t neglect your coolant, it will be inhibited. If you tie everything to ground, all you would need is a drop in coolant Ph and your system is toast. And if you ever lost your block ground, and grounded points on the radiator would become the primary path fit the entire electrical system, causing instant perforation. The damage you are seeing likely isn’t electrolysis, it’s most likely that acidic coolant burned through the pipes.
Good inputs. I’ll look carefully at the ground kit based on the concerns.
Had a good tear down day, maybe at the bedrock for this issue.
Done today:
a. Removed the water pump. It looks quite good and spins freely. Had some issue with the bolts however. One of the 16 bolts broke close to the tip (number Bottom or B4, increasing from driver side to passenger side). I will try and use a screw extractor and will tap clean the holes and use new bolts. Cleaned the pump gasket surface and the pump is ready to re-install.
Generally, the areas surrounding the engine was clean looking. The colder area close to the radiator was definitely the worse. I’ll clean the engine-side gasket area later.
Also drilled the thermostat and checked them. Good to go when the time comes.
Waiting for parts and then will start re-installing the water pump and go from there.
Based on the lack of sludge in the engine area, I will go ahead and replace all hoses and pipes before flush.
By the way, does anybody know where I can get a bolt kit for this water pump? I cannot seem to find such a thing. If I cannot find it, I’ll look for a replacement for the broken one and clean up the other bolts.
Another Q: There are 2 channels in the last pic through the gasket around bottom bolts B2 and B4. Is this normal? What is the purpose? looks like a kind of bypass. I just hope it isn’t a channel made by corrosion…
Mike - does this sage advise apply to all-aluminum V12, as well?
Obviously, the Gano filters are universal in application, I am focusing more on the specifics of he anti-freeze . . .
Francois - I have my water pump off and the bolts laying on my bench. The bolts are nothing special but are of 3 or 4 different lengths. The longer ones do double duty supporting other ancillaries.
If it’ll help, I can post photos of the bolts, water pump, and the diagram I sketched of the fitment of bolts to the water pump.
Yes.Silicates have an strong affinity for aluminum, which is why this style of inhibitor was used by Jaguar. The problem is that with the old antifreezes, tsilicates were near saturation, so as the antifreeze ages, they fall out of solution. OAT antifreezes, like Dexcool, have no silicates and their protection builds slowly on aluminum. The new hybrid antifreezes (HOAT’s) contailn low amounts of silicates specifically to rapidly build protection on aluminum components, blended with OAT inhibitors for long term protection of both iron and aluminum . The Mercedes spec coolants also contain trace amounts of nitrates, which protects against cavitation damage in wet liner engines. Although its largely a Diesel problem, consider it a bonus for the V12. So one jug works for everything, and you can go longer between changes. Mercedes engines use similar materials to Jaguar. I like using their stuff because they actually take the trouble to update their specs for older engines.
Less is more with the flush…don’t put three pounds of acid in your engine and expect a better result. Based on the fact that you’re not seeing too much bad stuff here, I’d reiterate the advice to use it at half strength.An extended water flush is more important, to flush out any loose accumulations.
The Feb 1974 Parts Manual lists all of the component parts including bolts that you need. (These are likely just ordinary 5/16 UNC bolts of various lengths in this case.) There is an article either on this site or on the UK forum (forum.etypeuk.com) listing how the bolt code translates the thread pitch, length, etc to a part number.
I cleaned the bolts and for the shorter one, I have ordered SS304 5/16-18 x 1 1/2" bolts. I’ll reuse the longer ones.
I used a 5/16-18 tap & die to clean the bolts & holes. For the one I suspected had broken off, I was still able to bottom out with plenty of margin with a 1 1/2" bolt. Actually no noticeable difference from its neighbors so it looks like there is no broken piece of a bolt in the hole. Maybe that bolt was cut but it didn’t need to be. Anyway I think I dodged a bullet since pieces of bolts deep in the engine block is not fun…