I have a XK140 DHC 1955, just got it back from upholstery shop after installing new carpet and top. I lost all my pictures of how to install the seat runners to the floor. Can anyone help me out here? I thought it was going to be easy but I only see two holes at the back of the runners that match up to the floor and no holes on the floor for the front of the runners.
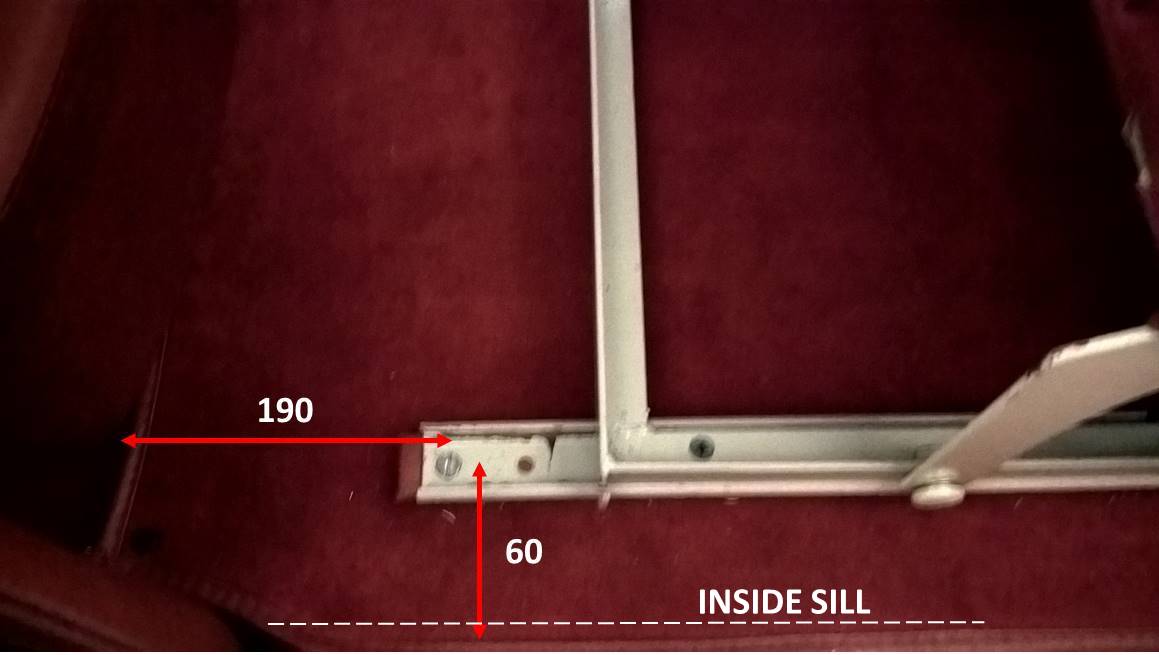
See picture of my XK 140 FHC but I don’t know whether the seat position is different in the Drop Head version. So please check!! Dimensions in millimeters.
Chris, if the 140 seat glide attaches to a steel, threaded narrow plate that is underneath the floor as in the 120, why can’t you insert an awl from underneath through the threaded hole and through the carpet, thus marking where the hole is located?
Hi Lewis,
What I am wondering is how to connect the front of the rails to the floor. I see the holes for the rear of the rails to connect to the floor but nothing for the front of the rails (no holes). Any suggestions?
Hi Bob,
Thanks for the picture, but what I am looking for is how to bolt the front of the seat rails to the steel floor. There are no holes for the front. Any suggestions?
Thanks
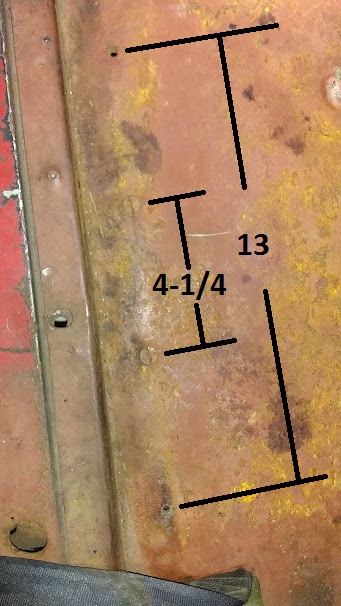
Hi Chris…sounds like you need to drill holes in your floor…but…why dont you have front holes in the floor…has the floor been replaced?..were they filled during painting…i dont have a 140 so can only assume the seat runners mount similar to 150…seats screw to the runners. …runners sit on wood taper wedges…screws go through runner, wedges, carpet, floor and screw into threaded bars under the steelfloor…im sure someone will confirm if your 140 is similar to my 150…Steve…ps photo 140 floor showing fixing holes
Chris, have you confirmed that there are two rectangular, narrow steel plates underneath the car? If yes, drill an undersized hole through the front holes in the plates up through the floor in your car. This will serve as locater holes for you to then drill holes from the top down for the bolt. You may need a stop on the drill to keep from damaging the threads in the plate.
The BD6244 steel tapped bars underneath the floor on my 120 FHC are roughly 15" long and 1" wide and 1/4" thick with four 1/4-28 ANF tapped holes, and are held to the main floor by two flat head screws spaced at 4.25" with more tapped holes at 13". I believe 140 has the same tapped bars.
Thank you Stef, I know the XK140 DHC floor doesn’t have the two front hole drilled plus the metal bar is only I use for the two rear hole on the slider. I could drill the holes but that wasn’t how the seat sliders where when I removed them. I wish I didn’t loose my pictures.
Looks like according to the parts catalogue there should be screws in the front.
Makes sense, there is a pulling up force when you lean back on the seat.
Hi Bob,
The part list shows the number of screws is eight. Two for each runner at the rear bolting to retaining metal bar underneath the floor. But nothing for the front of each runner. Each runner has two rear holes and two front holes. The two front holes have no matching holes on the floor. Nor is the retaining metal underneath the floor long enough. Not sure what to do.
Thanks
Regarding the 4 holes in each runner, the foremost and rearmost are the screws that go through the floor into the tapped plates. The second from front and second from rear are to attach the seat frame to the runner.
There are 8 countersunk setscrews holding tapping plates to floor 2 each
There are 8 countersunk setscrews holding track to tapping plate
Certainly on the XK150 there are 2 sets of positioning holes to basically have seat closer for short people and rearward for tall people only about 1 1/4 inches
This should help…i did ask before but no answer…have your floors been replaced/repaired…have the front fix holes been fill during painting etc…either way you seats need fixing at the front…2359 hold the fix plates(2443) to the underside of the floor Steve