The Jackard: A 1937 Packard Convertible with a 1962 Jaguar XK 3.8L motor

I figure instead of creating a lot of different topics with different questions I have; I’ll try to combine them under this single topic header.

Background/Recap:

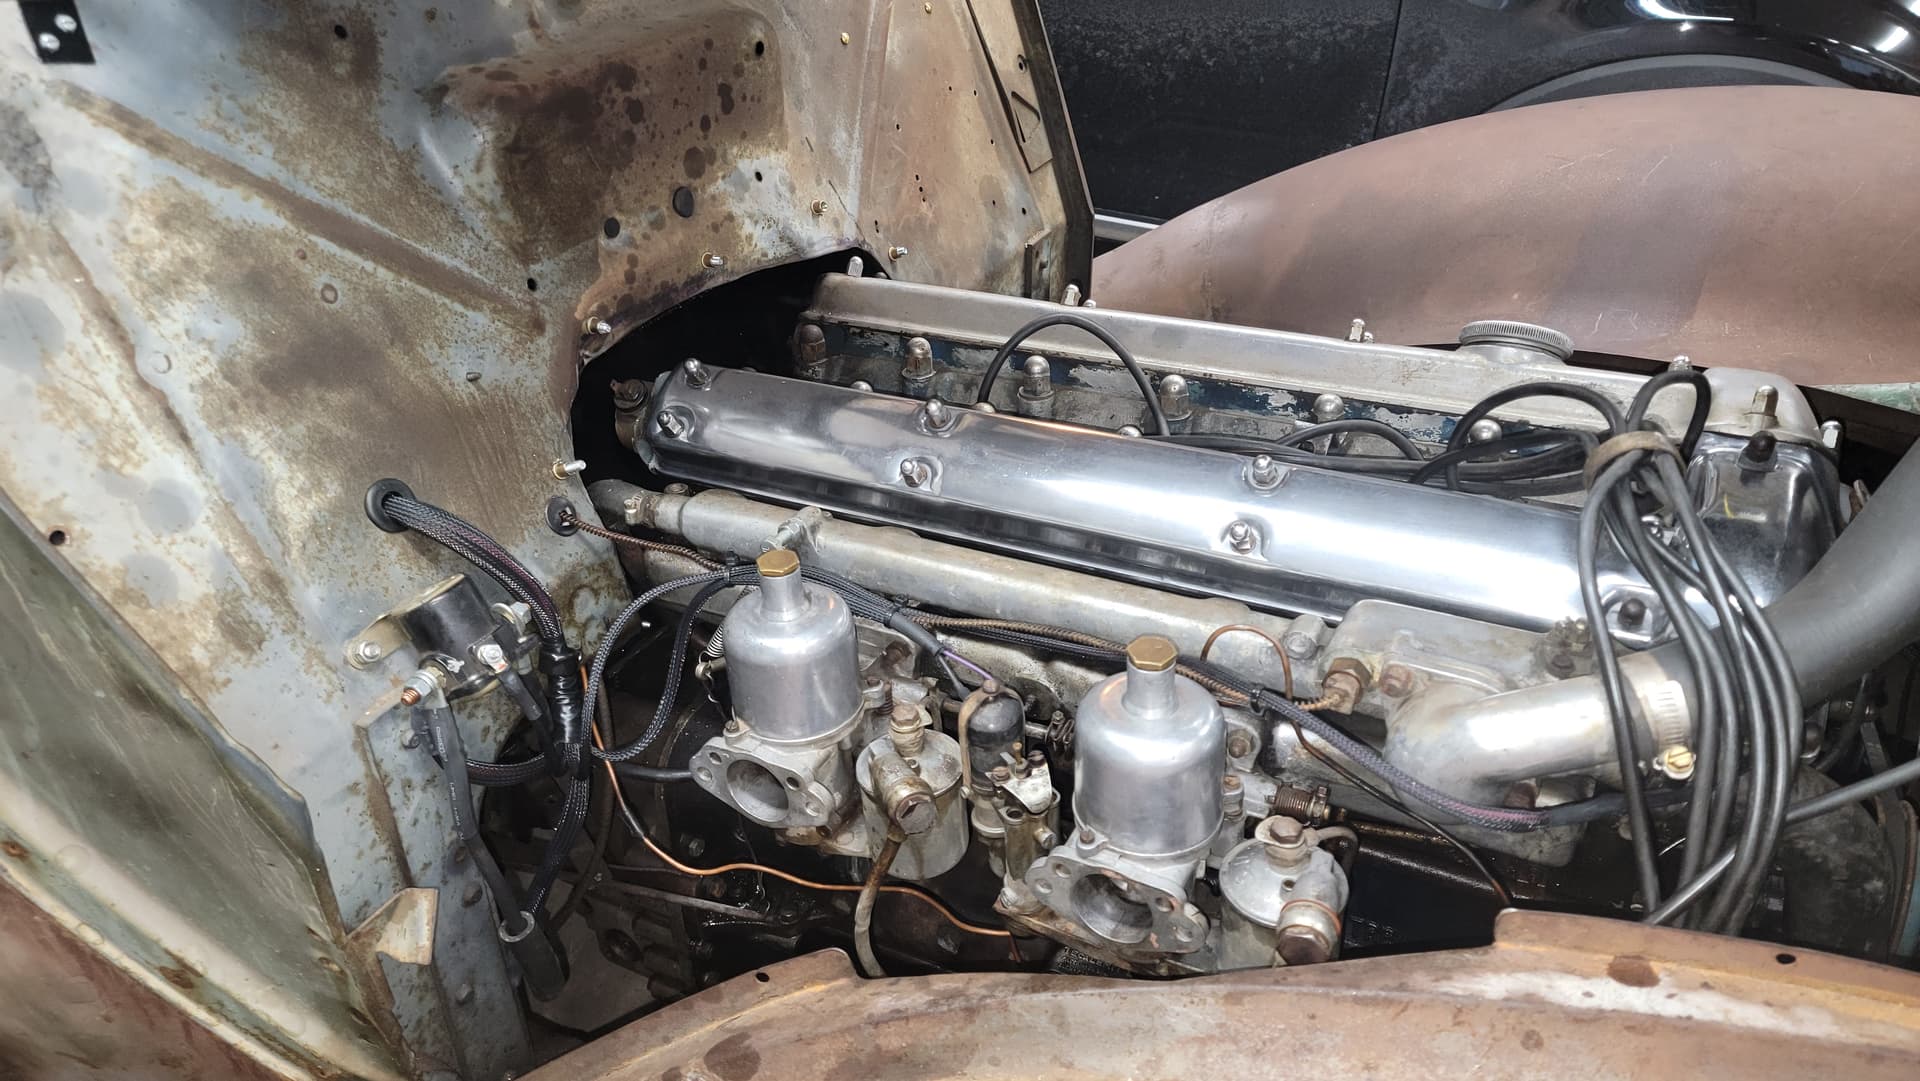
I have 1937 Packard that a prior owner (who passed away) stuffed in a XK 3.8L motor from a 1962 MK 2 (based on serial number LA1118-8). He was both a Packard and a Jaguar guy. So he had a MK 2 with a wreck of a body and a 1937 Packard Convertible Coupe with no engine. So he put them together. This was built as a fun/whatever car using just what he had on-hand. The engine is bolted via an adapter plate to the Packard 3-Speed manual transmission. These transmissions are pretty rugged, converted by hot-rodders in the 50’s for racing.

What I have figured out is that it has a smattering of 56/57 MK 8 parts on it. It has dual SU HD6 (Thermo?) carbs (AUC-838 tags). We think the oil filter head may be from the MK8 as well. It also has a VOLKS Torpedo-style air cleaner.

So you can imagine that coming into this, I know Packard stuff, but Jaguar stuff is foreign to me, and having a lot of mismatched parts makes the understanding even harder.

It’s running earlier exhaust headers (MK 8?) that go straight down and loop under the engine to the right side of the car to follow the original Packard exhaust path.

The distro needs to be rotated as the vacuum advance is touching the oil filter.

Other than the engine, and its bolted-on components, everything else is Packard. Except it has a GM 10-Si one-wire alternator. Also, it runs an aftermarket electric fuel pump tucked into the frame rail about halfway back. But that needs to be relocated closer to the tank.

This is how the car came to me. The prior owner was trying to build this to look like a barn-find hot rod from back in the day.

What I’ve done so far:

I’ve wholly re-wired the car as it was, umm, “get-r-done” wired before, and it was just a bit hazardous to my tastes. The Packard still has wood in the body construction in some parts, so yeah, top-notch wiring was a must. So it now has a GM-style street rod harness, with all fresh wiring and modern fusebox.

Also, when I received the car, only a piece of insulation covered the hole in the firewall that was made to allow clearance for the rear of CAM covers. The original Packard motor was a flathead-straight six. So very flat and skinny on top. So the firewall had to be cut to make the 3.8L XK fit. So I created a removable 16ga removable plate to cover the engine and seal the firewall. The plate is removable in the event I need to get at any of the oil lines on the back of the motor, as they are inaccessible from the engine bay side.

I have the motor running. It’s pretty rough when cold but seems okay-ish once warmed up. I think it’s running lean, as it really doesn’t like being off the ASC, even when warm. I have that running off a dash toggle switch, as the Otter switch is dead. It took me a bit to figure out what the Aux Starting Carb (ACS) was compared to the Carter WGD carbs I am used to. So I’ve been trying to crash-course as much as I can.

I have the original Packard AMP gauge as well as the mechanical Packard Oil pressure and water temp gauges plumbed and working.

I have a project blog on my Packard Website for anyone that is interested in the day-to-day work being done on it. You can find that here: Project Blog

Thanks for reading!

7 Likes

Looking through some pictures of finished engines and carbs that use Auxillary Starting Carb (ASC), I’ve not seen anyone that has this little shield in place. Also, looking at the SU diagrams, and the diagrams on Moss Motors, they don’t show it either.

The car came with this shield in a box of loose parts and came with a spare ASC with the shield in place.

Was this only used in specific applications? It’s hard to discern if this was originally painted or left natural metal. Any ideas?


2 Likes

The shield is to prevent fuel from spraying all over the place after a backfire. Not strictly required but yoj want to keep it.

David, thank you for the reply. Any idea if it was painted, plated or left bare metal?

So a little work on the car this afternoon. The carbs are idling way too fast even after fully warming up.

So some observations, and perhaps you guys can chime in as I’m not really familiar with these SU HD6 carbs.

First, when I noticed it was idling at about 2500 rpm (based on multi-meter tester connected to the coil). I don’t see any type of idle adjustment screw, as I think the large screw side of the carbs closest to the radiator is the mixture adjustment (red arrows)?

Even after being warmed up, I noticed that the “pin” (green arrow) on the Aux Starting Carb (ASC) was in the down position. I turned off the ASC via the dash switch, not much changed, but the pin stayed in the down position.

I turned the car off, and then back on, and then it idled a bit lower (2000), and the pin was now up.
I played with what I guess is the mixture screw, and with it tuned all the way counterclockwise, I got the idle down to around 1000. I did notice that screw does affect the idle speed so perhaps I have the wrong one.

I guess I am confused about what controls what as I’ve looked at several different diagrams and they are not 100% clear.

Any advice is helpful, or a link to clear diagrams, and adjustment instructions would be helpful. I am pretty visual, so need to see some pictures or videos if possible.

Here is what my carbs look like and the screw in question. Also, I see a reference to a jet adjustment screw and a low speed screw. Where are those exactly?

I imagine at the least, the carbs need to come out for a good cleaning as I know they have fuel sitting in them for at least 24 months. I did pull the dash pot off and clean the needle, seat and piston as those where sticky and gave everything a heavy dose of spray carb cleaner. Once I have the carbs off, I can see the condition of the throttle plates and shafts. Perhaps the plates are not closing all the way.

2 Likes

This looks like a great project. I’m tuning in to see how you resolve these issues. :slight_smile:

I will reply in Detail tomorrow unless someone is faster than me. As far as the shield goes I have no idea. I have the last ASC version made and that is a simpler shield and plain aluminium.

The carbs are designed to idle with the throttle plates fully closed. There are springs to hold them down. Loosen the linkages and insure they are closed. Adjust the idle speed and mixture screws to factory manual settings. If you have done all that my guess is you have a vacuum leak.
Pat H

A vacuum leak is for sure possible.

One inserting point if I do the lift pin test on the rear car once hot, it start to stumble. If i move the piston up about 1/4 i can get the motor to stumble to a halt. The front carb does not do that.

Its very possible it has worn or ill fitting throttle plates or shafts. Since this was put togther out of spare parts by someone else, i have do idea what was done, or what mismatched parts may be in the carbs.

Also, not sure what needle combo’s are in the carbs.

I’ve got a message into SU in regards to the correct rebuild kit for the carbs and ASC. Also what needle combo they recommend since this carb setup was orginally on a 3.4 and now its on a 3.8.

In other news, my end cap for the volks aircleaner arived from my mate in the UK.

So I gave that a quick test fit. I ordered an element for it a bit ago, but its still on backorder. So i may have to see if I can find an alternate. I’ll need to give it a coat of paint as well.

1 Like

What is the purpose for these holes in bottom of carb intake? I would imagine at a minium they should be plugged…

The ASC needle is drawn down by vacuum/air flow. When the otter switch is closed it powers the solenoid and that allows air to go through the ASC. More load means less vacuum means the needle isn’t sucked down as much means more fuel is added to the intake.
Generally if the ASC is on the needle should touch the stop at idle and if it is off it should be all the way up.

The HD6 are simple, as said they idle off the only jet, all mixture adjustments are done at idle by adjusting the height of the jet. That’s what the small screw acting on the lever does. Screwing in makes leaner and out makes richer (unless I‘ve got it wrong, mostly do).

The larger screw that goes into the body adjusts the amount of mixture for idle, while the throttle is closed all the mixture for idling goes via that screw.

The lift pin must be lifted until it touches the piston and then 1-2mm further. You can also lift the piston from the front with a screwdriver.

If one carb doesn’t react it might not provide anything or just be very lean already. Does it get enough fuel?

Next, look up the base settings (jet 2.5 turns lower than flush, idle screw this many turns) and disconnect the throttle linkage, make sure they are both closed, reconnect and start engine. Take a hose (3-10mm ID?) and use it like a stethoscope to listen to the hiss of either carb. Make sure they both sound the same. Now the throttles are synchronized.

Next, fine tune by going back and forth between mixture (lift piston to see if it is still changing engine speed) and idle screws keeping them synchronized. If lifting drops the speed it is lean, if it speeds up it is rich and if lifting it a little does nearly nothing but lifting higher up makes it stumble it is set right.

The base manual settings only provide a starting point that should get the engine running so you must go through this procedure once the ASC shuts off. The engine will run a little richer with the air filter in place.

The burlen website has a good collection of articles, especially about the ASC.

You can plug the holes but they’re not a vacuum leak. Crankcase ventilation maybe?

2 Likes

Good, thorough response. I also have a set of tubes that fit into the piston damper tubes. They have cross pins that when pointed at each other and shows the relative piston heights. Regarding setting mixture by raising the pistons, I’ve been told you adjust one carburetor by raising the piston on the OTHER carburetor. Interested to see any comments about this.

Thank you for the detailed response. I think part of my problem was terminology. Between your explanation and the better diagrams I’ve pull off the SU website are now bringing things in better perspective. Also ill get back in there and look, but i just was not seeing those jet adustment screws.

At a minimum, it needs all the gaskets and seal replaced. Im pretty sure this was all reused parts and it currently seeping fuel at the rear carb banjo bolt float bowl.

And then dripping onto the exhaust underneath it where it crosses under the engine. So yeah, that requires imediate attention.

1 Like

Drains for moisture that has collected in the low points of the aluminium air filter adapter. The air filters wrap over the top of the engine because the combination of the narrow, tapered engine bay and the steering shaft on the home market right hand drive models didn’t leave much room for the filter. You probably have plenty of room for some other arrangement.

1 Like

Excellent project!

I have a Jageep (Jee Type) that you can find a thread on, about.

Look forward to hearing more about the project.

Mike Thanks! Are they supposed to have some kind of fitting in them?

Does anyone have an option for the air filter element for torpedo (volks) style air cleaner (MK. 7-9). I have one on order from Moss Motors, but no ETA.

Their option to the unavailable original style (#1 on the diagram) is 4 stacked smaller filters (#2 on the diagram). Just trying to see if anyone has come up with another option that works.

Some tractors had similarly-shaped filters: if you enter the dimensions into a googlebox, you likely will find one to fit.

I feel this thread belongs in the Lounge, since it’s not strictly on-topic for Saloons (despite having a Jaguar engine out of a saloon).

That way, more members can contribute their $.02 and enjoy the discussion. However, I’m not going to insist. It’s up to you guys.

Kevin, would you object to me moving it? Would anyone else object?

1 Like

No objection from me!