I am within days of getting the heads back from the machinist. They gave me a listing of 8 tappet shims that would bring the lash into spec on the first head. To be certain (and avoid 2 or 3 mailings to get the right stuff) I ordered the 8 and also 1 shim thinner and 1 shim thicker than requested; 24 $him$ in all. It turns out that after reconciliation of all that math, I ordered 2 of each specific size. Took two endors to fill my needs. the final result had me order two of each shim – see attached
I was a bit disappointed with the specs of them from one vendor. This matrix shows what I mean.
I realize these deltas are small fractions of an inch – but the shims are available in 0.001 increments and cost ~$10/each. In setting valve lash (which I hope I will never deal with again (I just turned 69))
a 0.001 inch can make a difference. Some varied by 0.0025".
I delivered them to the machinist yesterday (28JUL22). These should have allowed him to set the valve lash on one head. It needed adjustments to 7 of the 12 valves and the other head needed 5 valves adjusted.
Just took a call from the machine shop this AM (29JUL22) and they were able to get 23 of the 24 valves adjusted to within specs (0.012 - 0.014). Obviously they were able to shuffle unneeded shims from the one head to be used in the other. They still need 1 shim to get the last valve lash in spec: 0.0850. I ordered a 0.0840, 0.0850, 0.0860.
I shared the above matrix with the vendor. Said they didn’t have any previous complaints / comments.
Hmmm.
But I also got an e-mail with a photo within 30 minutes of the shims in a micrometer showing the proper measurements. Should be here on Tuesday (02AUG22).
So – anyone doing valve lash adjustment needs to keep manufacturing variances in mind and order accordingly.
I gave this issue several months of consideration and on-line research before pulling the trigger.
Long story short – I deemed it appropriate to have a ceramic coating applied on the brand new paint before I got the inevitable first scratch / mar / schmudge. I said “have a ceramic coating applied” knowing they are plenty of DitY products out there. I deemed those kits to fall in the same category as “epoxy” floor coatings: yah, you can do it yourself but you get a better, more permanent result with professional applications.
Pros of ceramic coatings:
UV protection
hydrophobic
a very slight (very slight) bit of protection from road debris
an extreme level of shine with an it’s-still-wet looking paint for years
Cons
cost
needs to be reapplied over time
prep
The place I went with had kits that came with a 1-, 3-, 5- and 7-year guarantee. The last two levels REQUIRED a professional application and included two ceramic coating. Turns out the actual application was pretty straight forward; it was the prep that required a professional hand.
It took some calling-around to find an outfit that would apply the ceramic in my hobby shop. But found one.
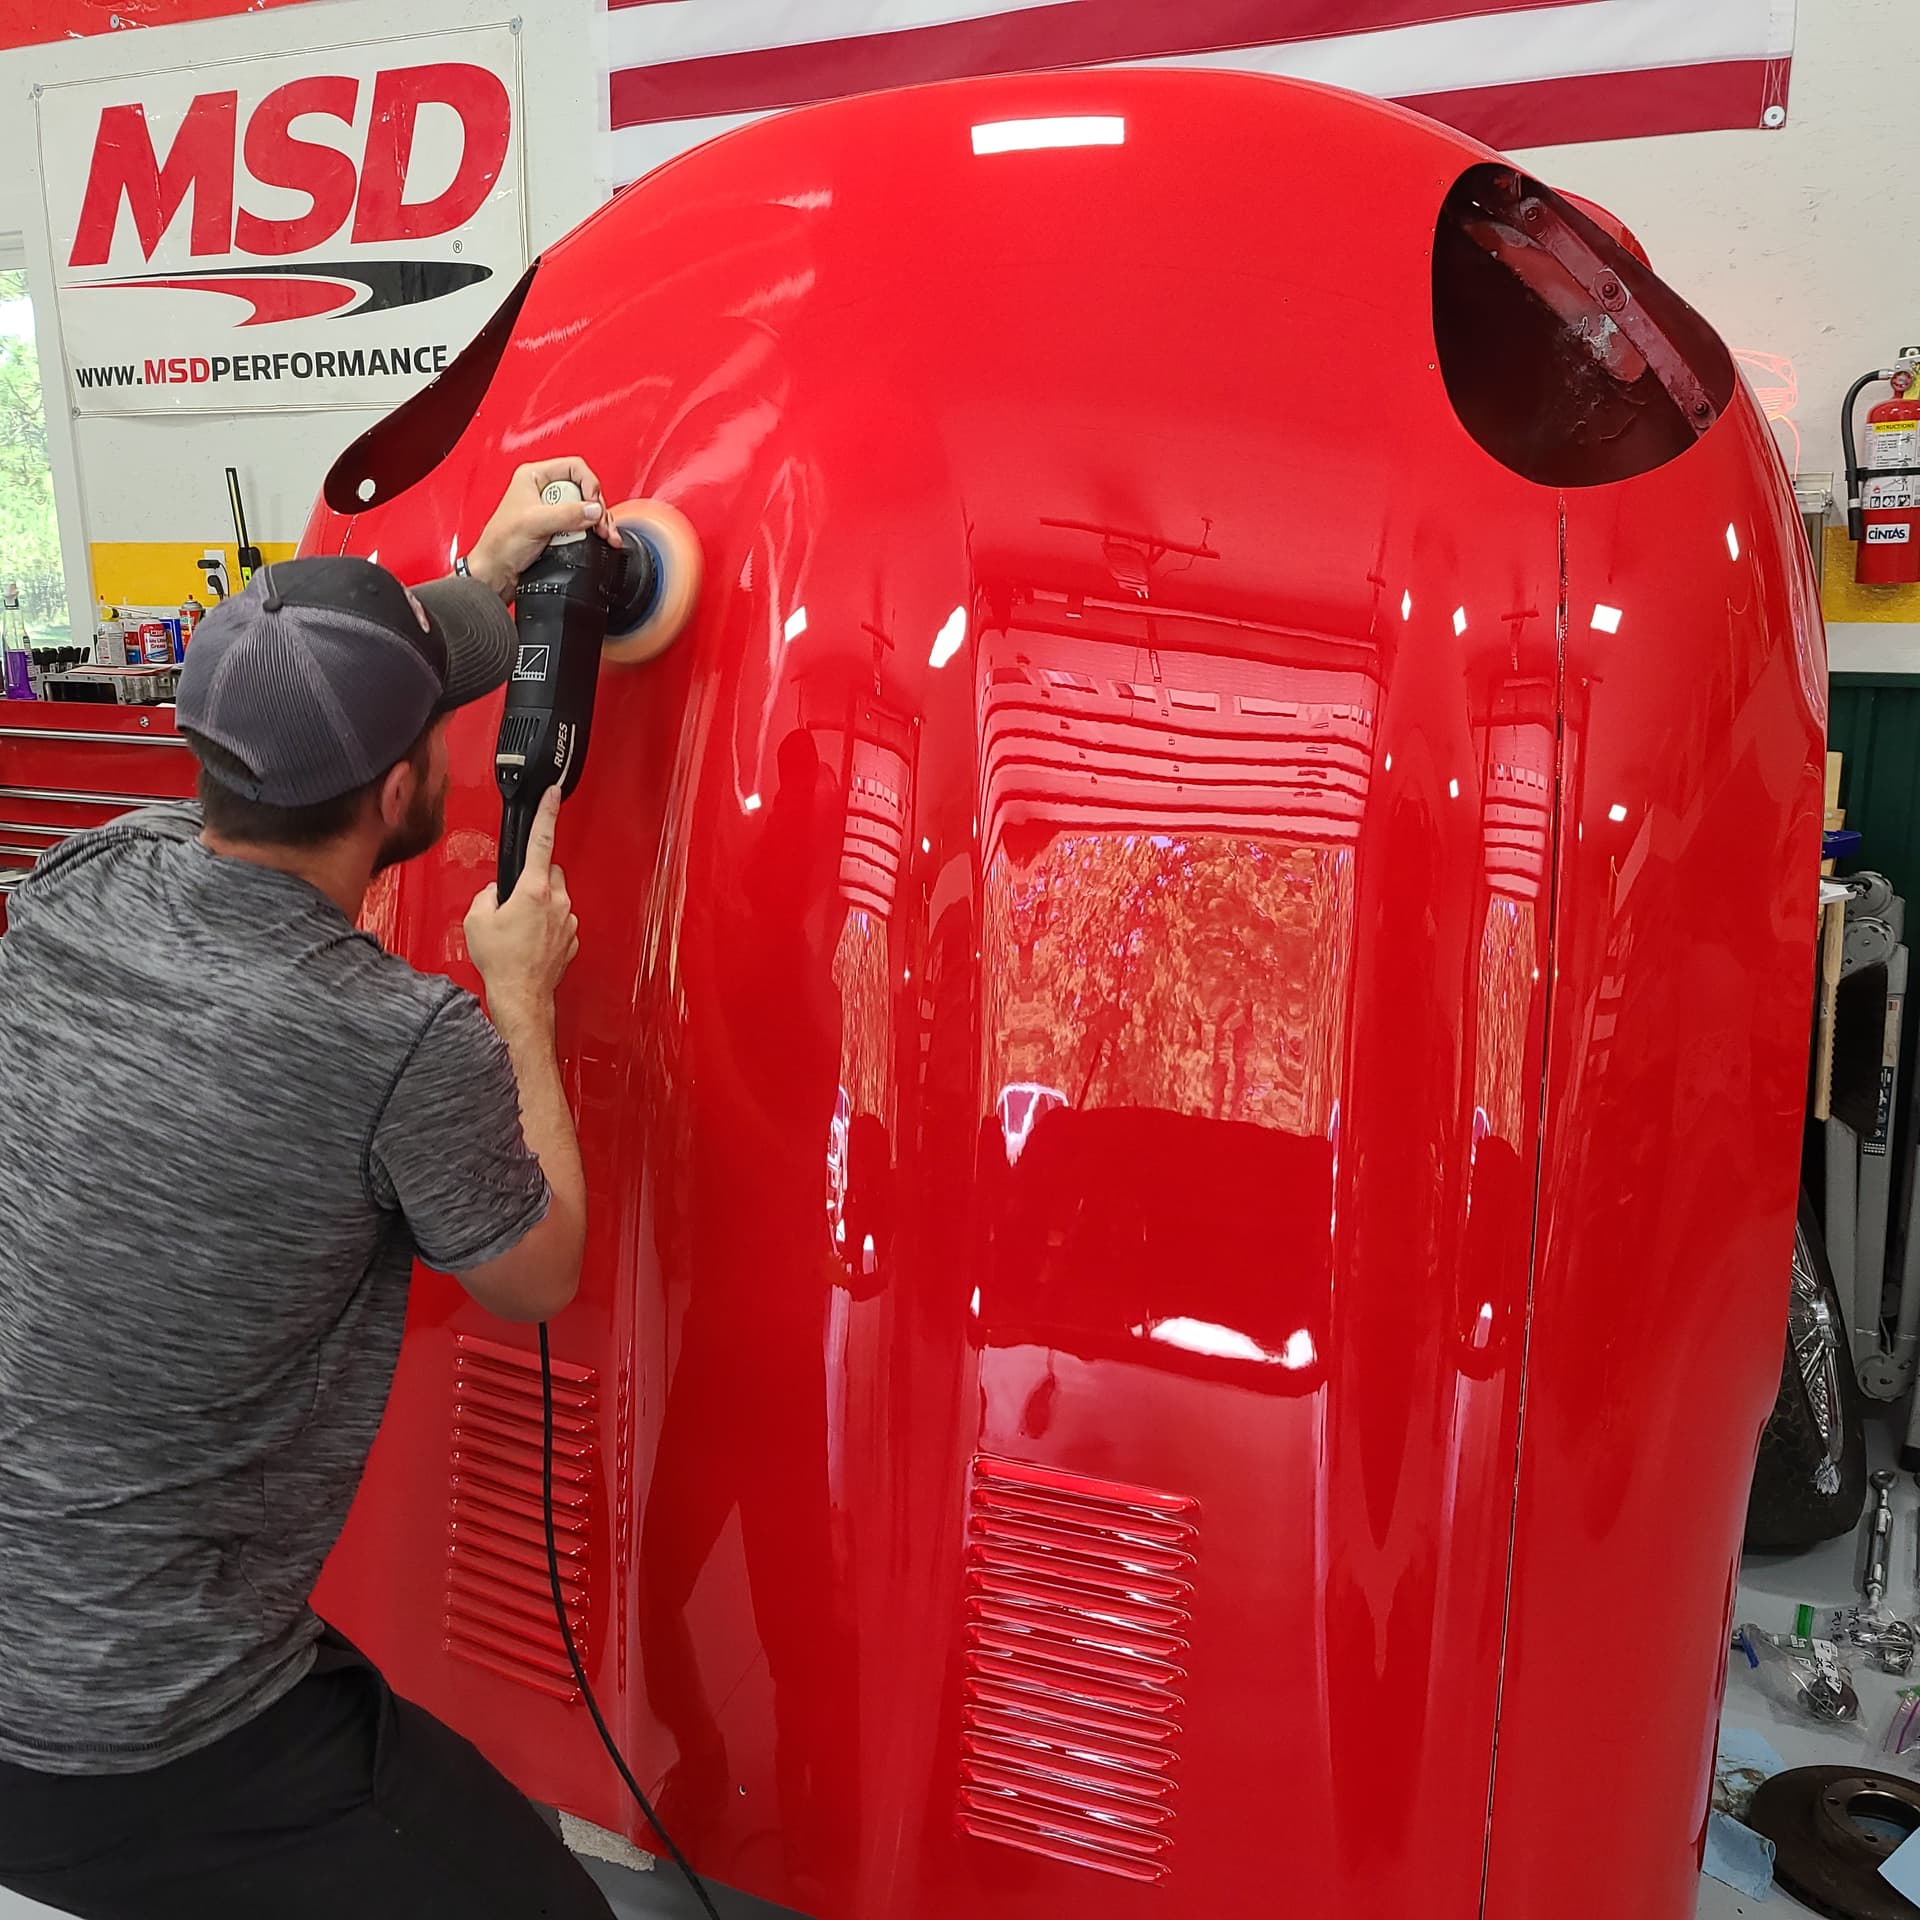
The prep involved two steps: a very light cut of the paint followed by a polish prior to applying the ceramic fluid.
My painter used a 3,000 grit for the final wet sanding he applied; the cut from the ceramic guy was 30,000 while watching for low- and high-spots in the paint (he had but didn’t need to use some goo to deal with them). He said the painter knew his business.
Then he polished the paint
And applied two coats of ceramic
I like what I got.
This is final polish touch up – after the ceramic application. It gets shinier and wetter-looking than this
It is hard to photographically capture a shiny paint compared to a shiner ione. This shot of the bonnet in bright sunlight does NOT do it justice (note how the louvers are “blurry” from the reflection). And the tech said it’ll take 2 full weeks to set up but the ceramic coating gets a bit shiner each day until set up
In my little peabrain, I have this part associated with the AC (something with the drier?) – but there is no guarantee of that.
Here are 3 photos with a tape measure for scale.
The 4x studs on the piece are 32-10
It looks familiar, but my car is altered, so I can’t immediately see where it goes.
Check the distance between the studs against holes in the mudshields and a Lucas relay. It may be for mounting bracket for something in the engine bay.
MarekH – great idea; will check that span today.
Thanx
Good thought - but mine is a 1972 that came with the Horn Relay bolted directly to the inside vertical face of the passenger mud shield. It is my understanding the Horn Relay Bracket was introduced in 73 or 74. Thanx for the thought, Robert.
Craig,
It’s a horn relay mounting bracket as far as I know! Not found in the RTC Parts book, not mentioned in any Service Bulletin or Other Jaguar Bulletin(s) that I’ve come across.
Take A Lucas relay and see if it mounts between two of the studs. Take the bracket and see if the studs match holes in the RH valence/mud shield. I was under the impression the bracket was introduced in later cars (73-74 MY) but without documentation who can say when the bracket was introduced!
@Dick_Wells - could you please photo the underside of your bracket? Those four 32-10 studs all have large flat heads as evidenced in this photo? Match?
Robert – my apologies. I dismissed your comment out-of-hand. I was 101% certain my Horn Relay was bolted directly onto my mud shield. I have spent hours searching unsuccessfully through my photo archives for how the Horn Relay was attached.
It looks as tho you had the correct response all along.
Here is a photo from this afternoon (01AUG22) of the bracket set in place on the passenger side mud shield. And – although I didn’t photograph it – the studs on the bracket not only perfectly fit into the holes in the mud shiels, a Lucas relay slides easily over the other pair of studs.
My battery tray is not yet installed - so this is a clean shot toward the engine bay.
It fits snugly into existing holes in the mud shield. I thought the Horn Relay was mounted onto the mud shield using the two holes on its other face – just to the right of the bracket in my photo.
I was in a hurry – I think I need to rotate the bracket 180° vertically so the 2 studs that are ~not~ through the mud shield are facing the camera lens providing better access to mount the relay.
That is, unless the round tube of the side frame then gets in the way. Something to play with tomorrow
Dick – well – that clinches it.
The part (unidentified and without a Jag Part Number) I have is identical to the one your photo. The only difference is mine looked to be cadmium plated rather than painted black. That’s why I plated mine.
This expands the usage range of this U/I bracket to a much earlier date than you first conjectured – you supposed its usage to MY 73 and 74. My E-Type is UC1S20954 manufactured in fall 72 (Sep or Oct? - I don’t have a Heritage Certificate)
Another Jaguar mystery!! If other S3 owners would check their car(s) and chime in that would be most helpful to the community. I only throw out “Gustimates” for “when”!!! Cars outfitted tell the real story.
Dick
In a message dated 8/3/2022 1:10:43 PM Eastern Standard Time, noreply@jag-lovers.com writes: