I’ve been doing all the research and putting together a parts list for a DIY EDIS project on my Mk2. I think I’ve got it all figured out, my question is this. My plan is to start with EDIS, and then start to work through a DIY EFI setup later in the year. Should I start with MJ and then connect it to or replace with a megasquirt if I go that route, or just start with the megasquirt? I now the MS can control the ignition without EDIS but I’ll probably use it anyway since it’s so well documented. Can the existing ignition maps for MJ can downloaded into MS or is it a different interface? Anyone who has more knowledge of these systems, give me some guidance? Thank you
@Ray_Livingston and others have a good amount of info on this.
Phillip Lochner, in ZA, also has done this stuff.
Theo
I have started to build a Megajolt system for my Mark 2 and have done a lot of digging for information.
My car is in winter storage at the moment but I have looked at some cars nearby to do the design work.
The parts are all selected and are all on order now.
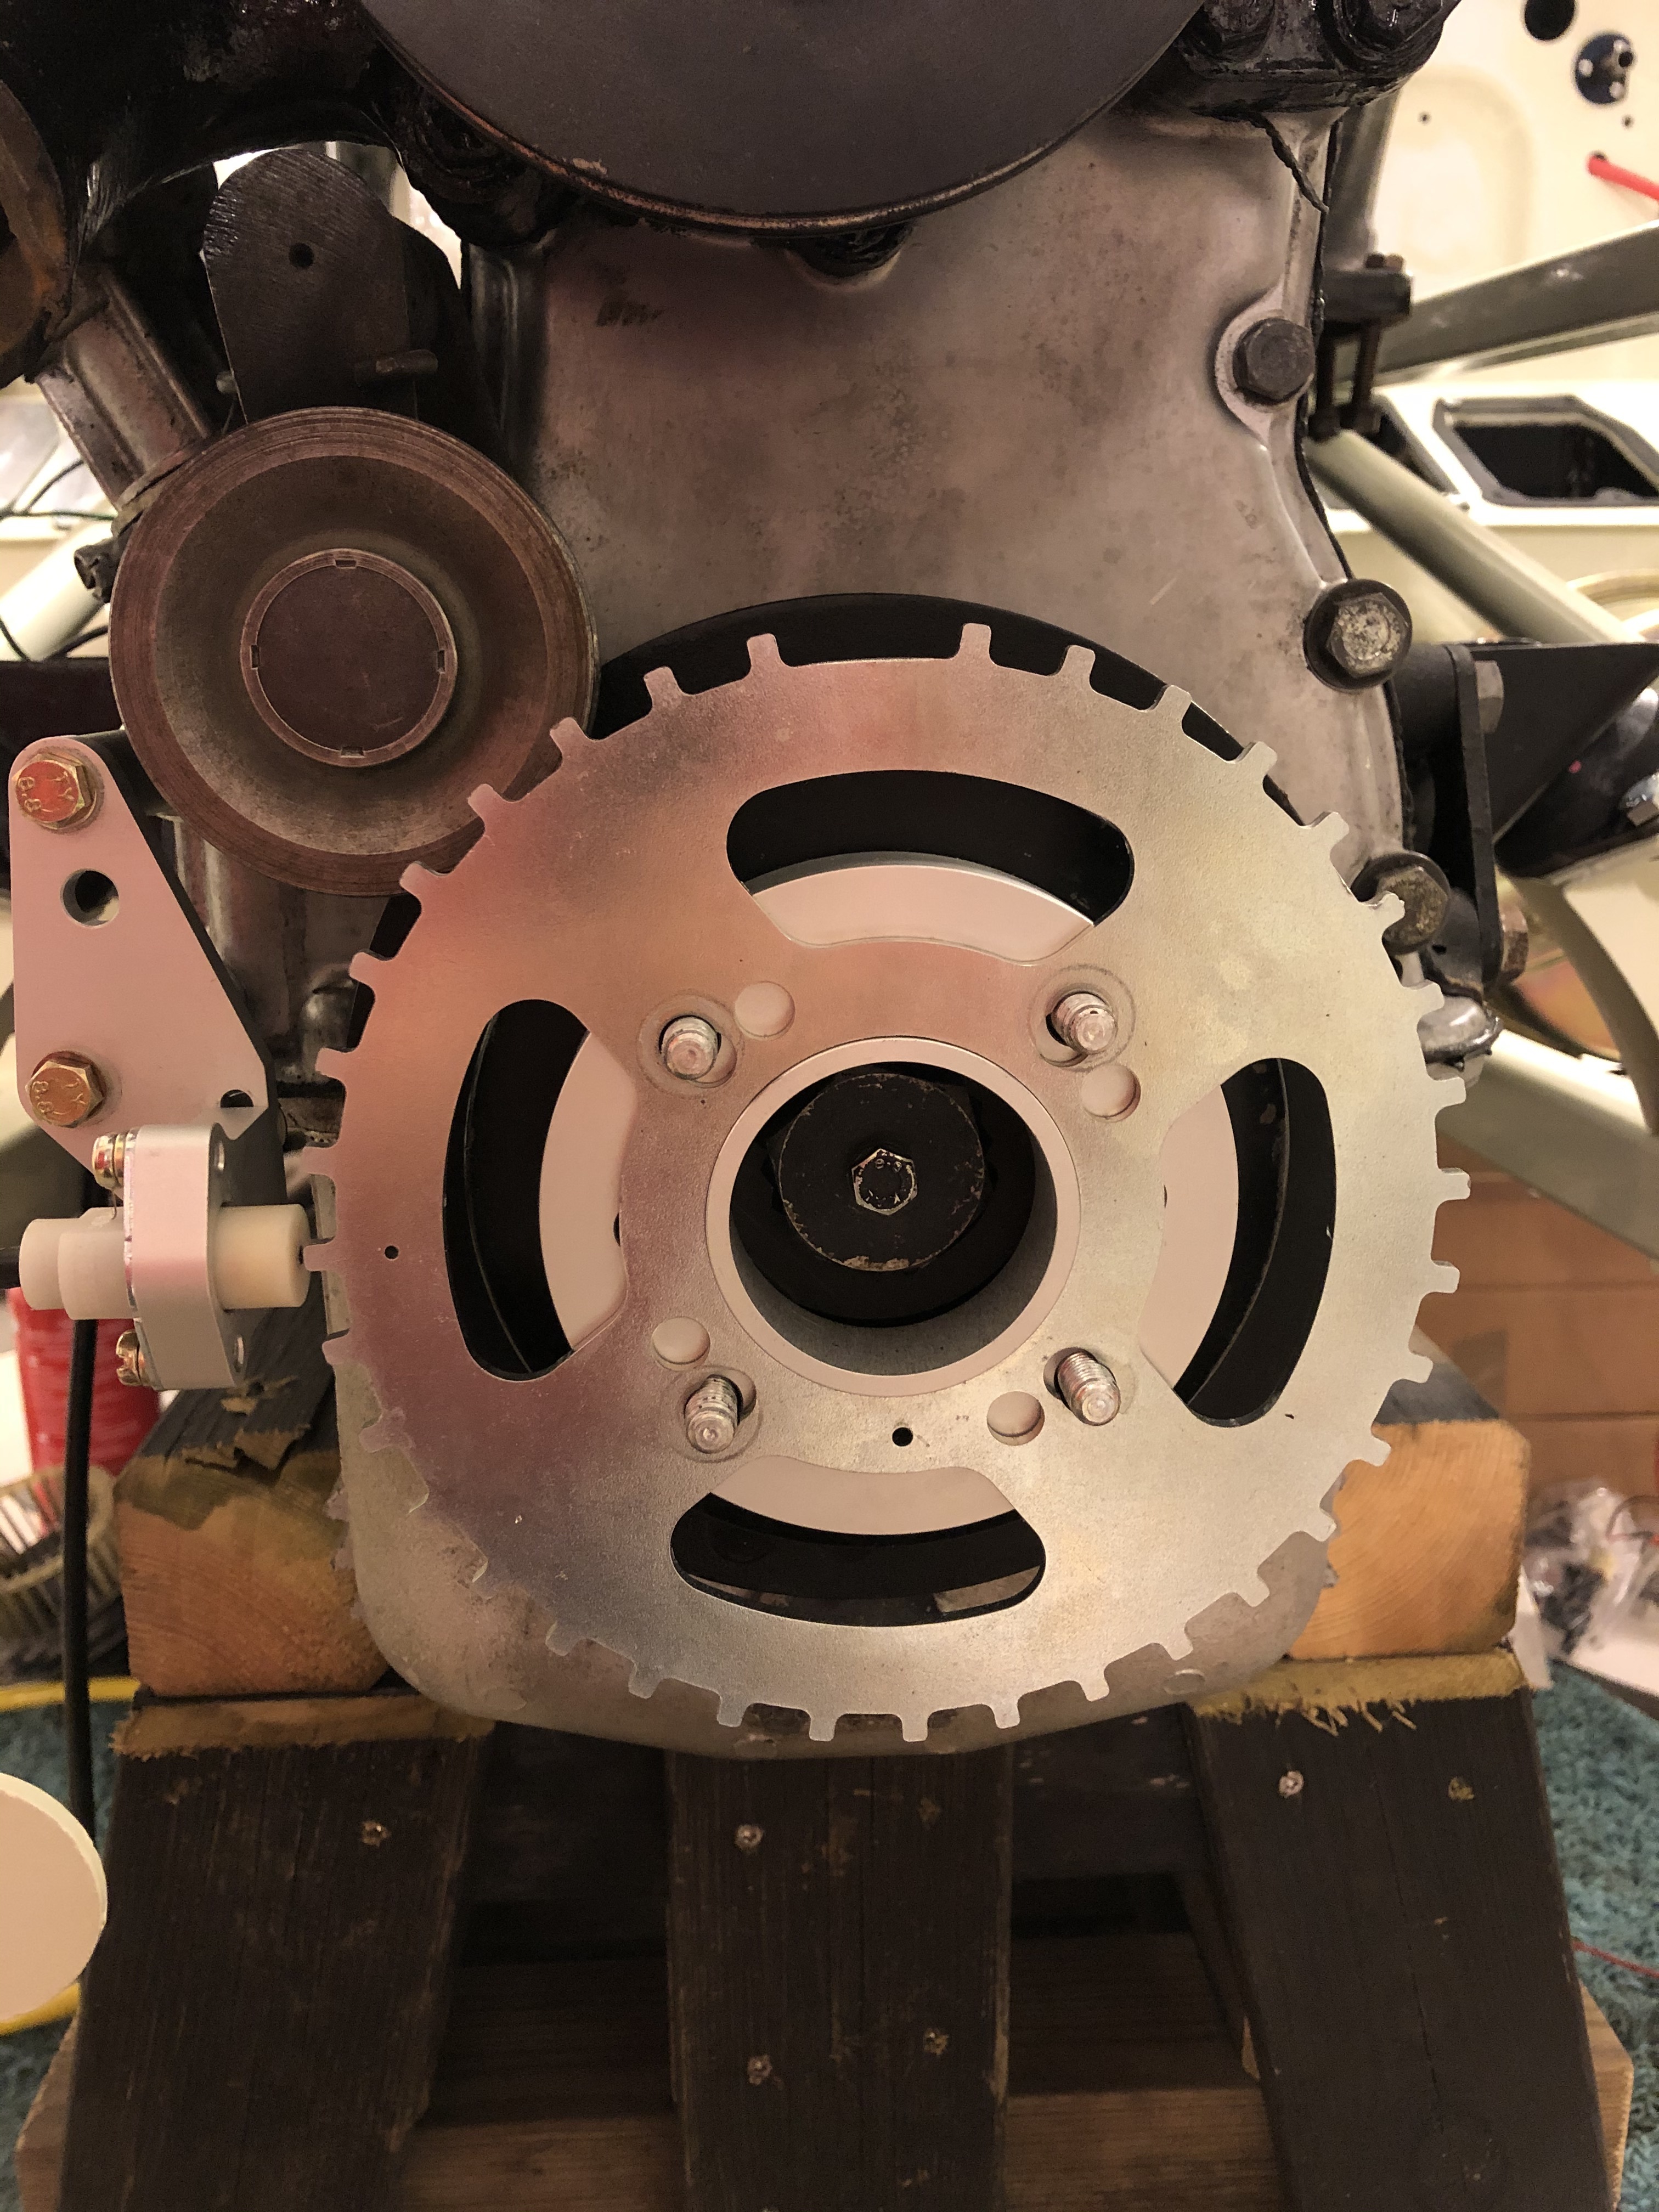
The Ray Livingstone approach is presumably fine for E Types but on the Mark 2 there is no space to fit the timing wheel as he did because the clearance between the fan and the crank pulley is too small to accommodate the crank sensor. If you replace the original fan with an electric one in front of the radiator then you could use his timing wheel setup.
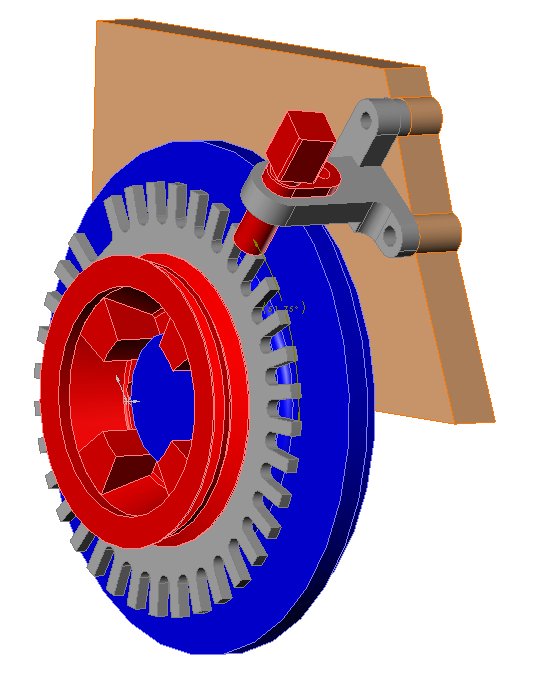
After much deliberation I have come up with a scheme to place the timing wheel on the back side of the crank pulley as shown in the design picture. This involves making a custom wheel and then doing some very careful machining to match the conical taper on the back side of the pulley. At this point I have made the timing wheel but left it with a plain bore until I get my car out and can fit the wheel to the pulley. The wheel will be clamped between the conical face and the front face of the damper. Once the angle is set, the wheel will be taper pinned to prevent any rotation.
I am fortunate to have both lathe and milling machine to make the necessary parts.
The VR pickup bracket has been made and checked on a spare timing cover.
I have run tests on my lathe to check the pickup output waveform and the setup and waveform are shown below. I found during early tests that the tooth width should not be wider than 0.25” so as to obtain a nice looking sine wave. At a width of 0.3” the waveform was a little distorted. The wheel width is 0.2”. I also made the teeth to be of constant width so that the output voltage would be as high as possible. At 500 RPM the output was 5Vrms which is plenty.
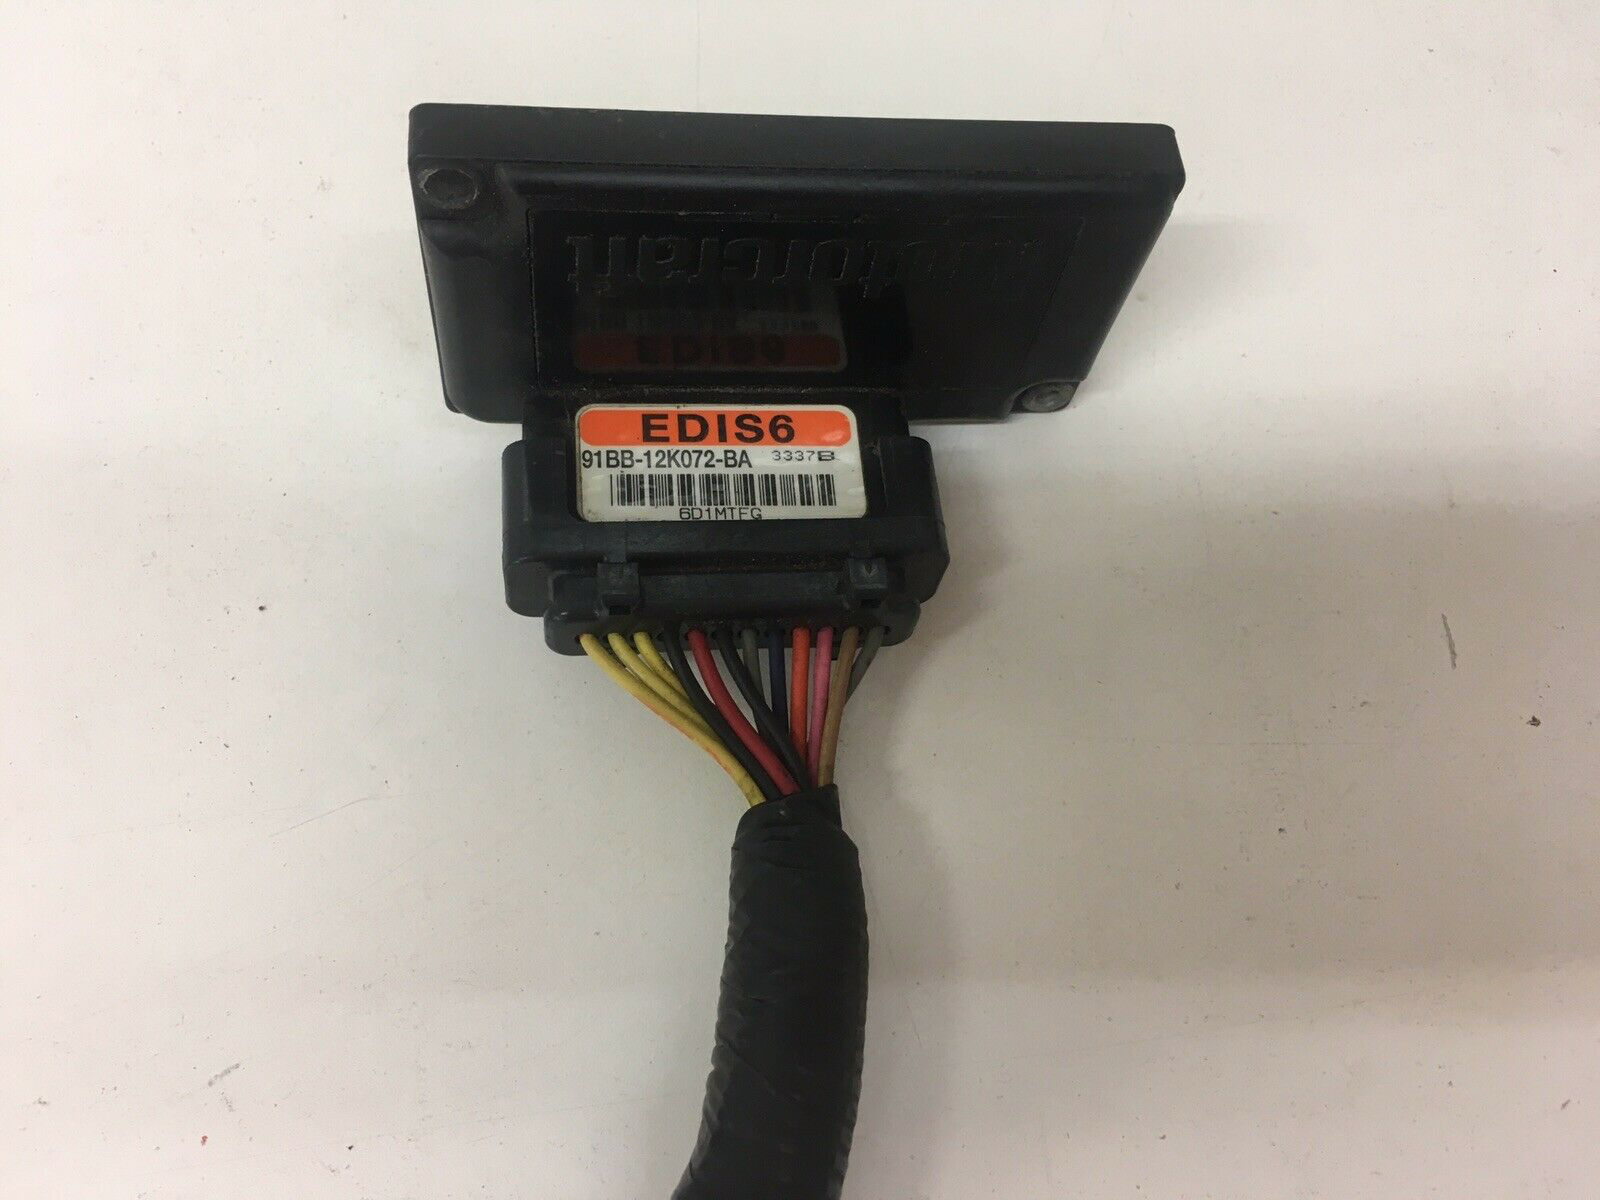
Beyond the Megajolt itself, the following is the list of parts ordered from RockAuto.
| 6 Coil Unit Early | DGE446 | Motorcraft |
|---|---|---|
| Crank Position Sensor | PC418 | Standard Motor Products |
| POSITION Sensor Pigtail | HP4710 | Standard Motor Products |
| EDIS-6 | LX254 | Standard Motor Products |
| EDIS Connector | S-744 | Standard Motor Products |
| Coil Connector | S658 | Standard Motor Products |
| Trigger Wheel | Made in house | B Murray |
| Plug wire set | 8661 | United Motor Products |
I am using 8661 wires because they are black and also they have the special connectors onto the coils. They will be fitted with right angle plug terminals after they are trimmed to length on the final install. I have made a wire separator like was used on C-Type engines.
The parts list took a lot of head-scratching looking at alternatives. I went with all new and chose the coil made by the OEM. I did consider a new Motorcraft EDIS-6 but these are not available as far as I could see.
The next step is to build a breadboard setup and run the timing wheel on my milling machine. Although this will only run to 2200 rpm, it will be sufficient to check the centrifugal advance is working suitably.
My parts should be all in in a week or two when I will post again showing the breadboard results.
All for now
Bruce


2 Likes
Wow, you have done a lot of research! This is great. I’ve done similar but was going to piece together all the parts from different sources, amazing you’ve found everything on Rock Auto. I was debating between an Accel coil and an aftermarket but the Motorcraft one looks great. My Mk2 has no mechanical fan so it’s no issue to mount the teeth and sensor. I’m going to likely weld a ring gear from trigger wheels onto my pulley. And then use one of Ray’s ignition maps. And on the UK forum Ray mentioned a company called Kingsborne wires that will make a custom set of wires that will be the right connections for this setup. I’m currently moving the battery to the trunk to free up that space to mount the coil and module on the firewall. Keep me posted on your progress!
Must be at elast 15 years now since I did this conversion on my S1 XJ6, and 12 years since I did it on the S-type.It’s pretty astonishing that it’s not become a lot more common in all that time. The best upgrade I ever made to my XJ, and that has seen too many modifications to remember in the 27 years I’ve owned it 
When I converted Tweety to EDIS, I was unprepared for how much better it ran, and mine had the “really good” Mallory Unilite in it.
Strange you should mention that… My car also ran a specially calibrated Unilite for many years before the conversion and I never found any improvement at all in how the car ran with it. After fitting the MJ EDIS system it was a very real transformation. At the time there were no other installations to look at, so I developed my own maps by running up a local mountain with my son holding the laptop on the seat next to me
1 Like
The Unilite ran better, to the extent that it was pretty much “set and forget.” It got rid of those stupid fu%#£&ing points and condenser!
But, as you saw, the EDIS was radically transformative. I’m going to do the same to my Rover.
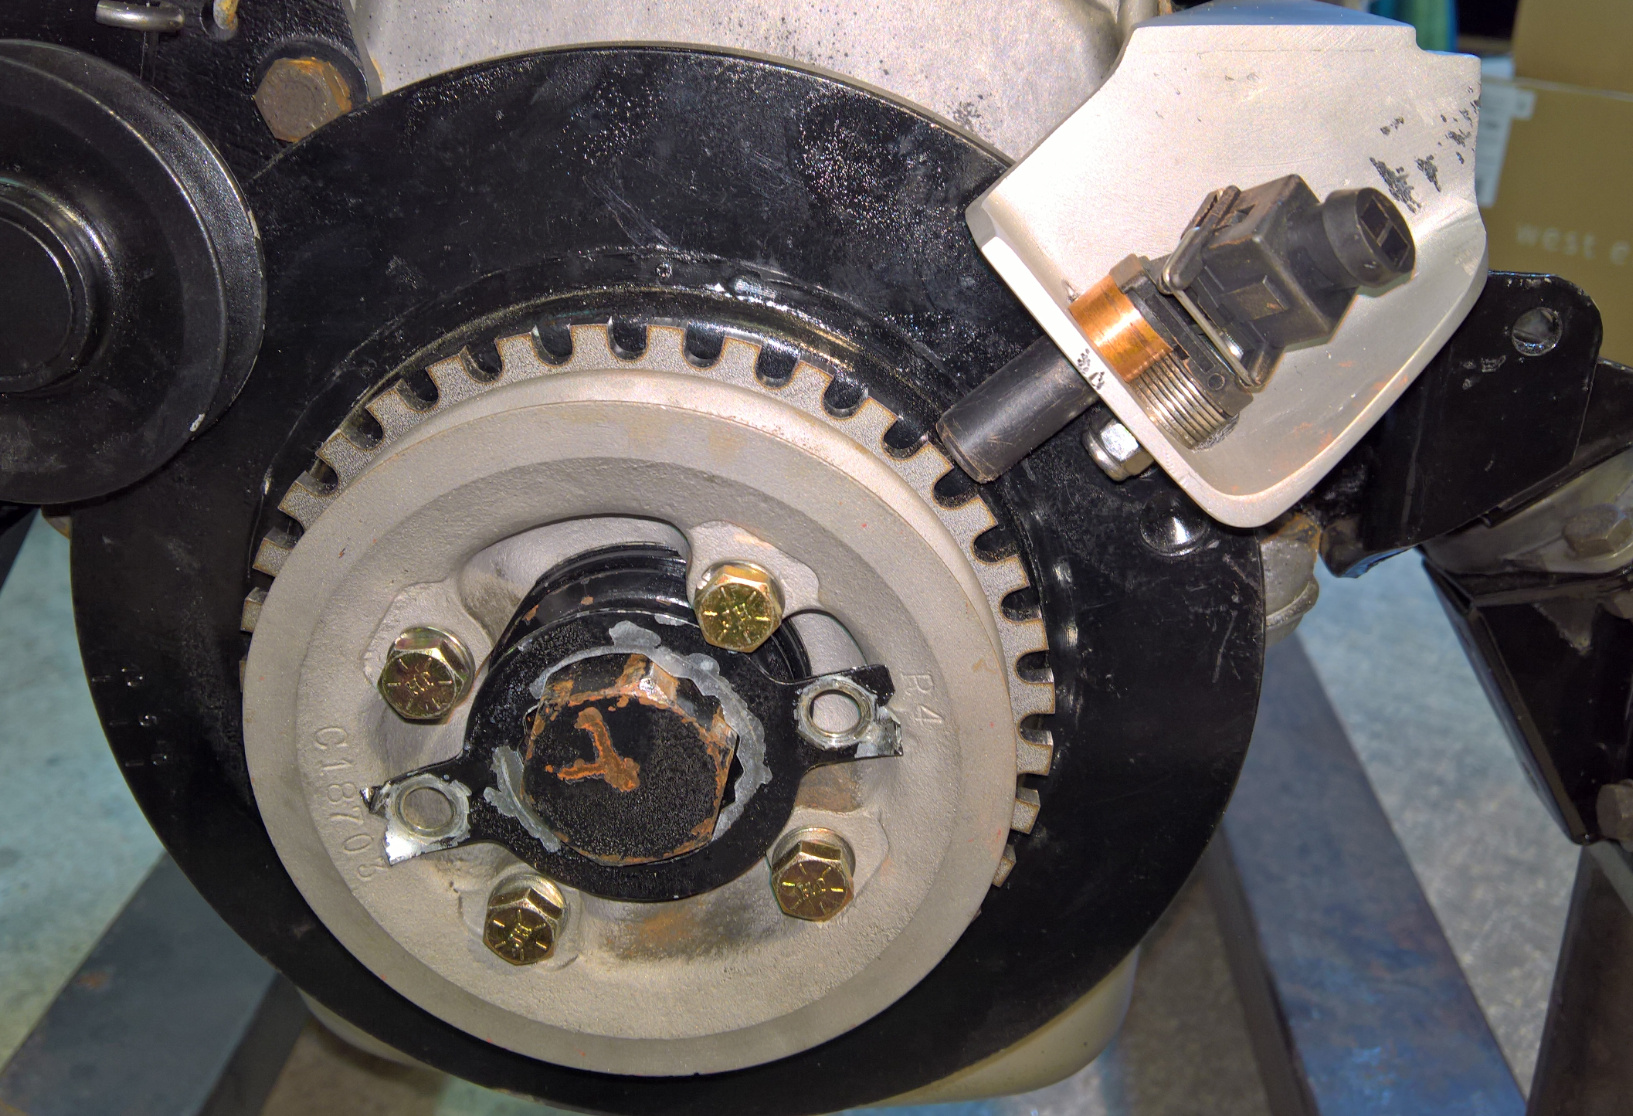
I did as Bruce mentioned putting the trigger wheel on the backside of the crank pulley. I bought a stock trigger wheel and took it and the pulley to a local machine shop. The trigger wheel hole was enlarged to slip onto the pulley, but I did not have the taper matched. I found that the taper was subtle enough where this didn’t seem to matter. Once positioned I welded the trigger wheel to the pulley. Below pic is during test fitting.
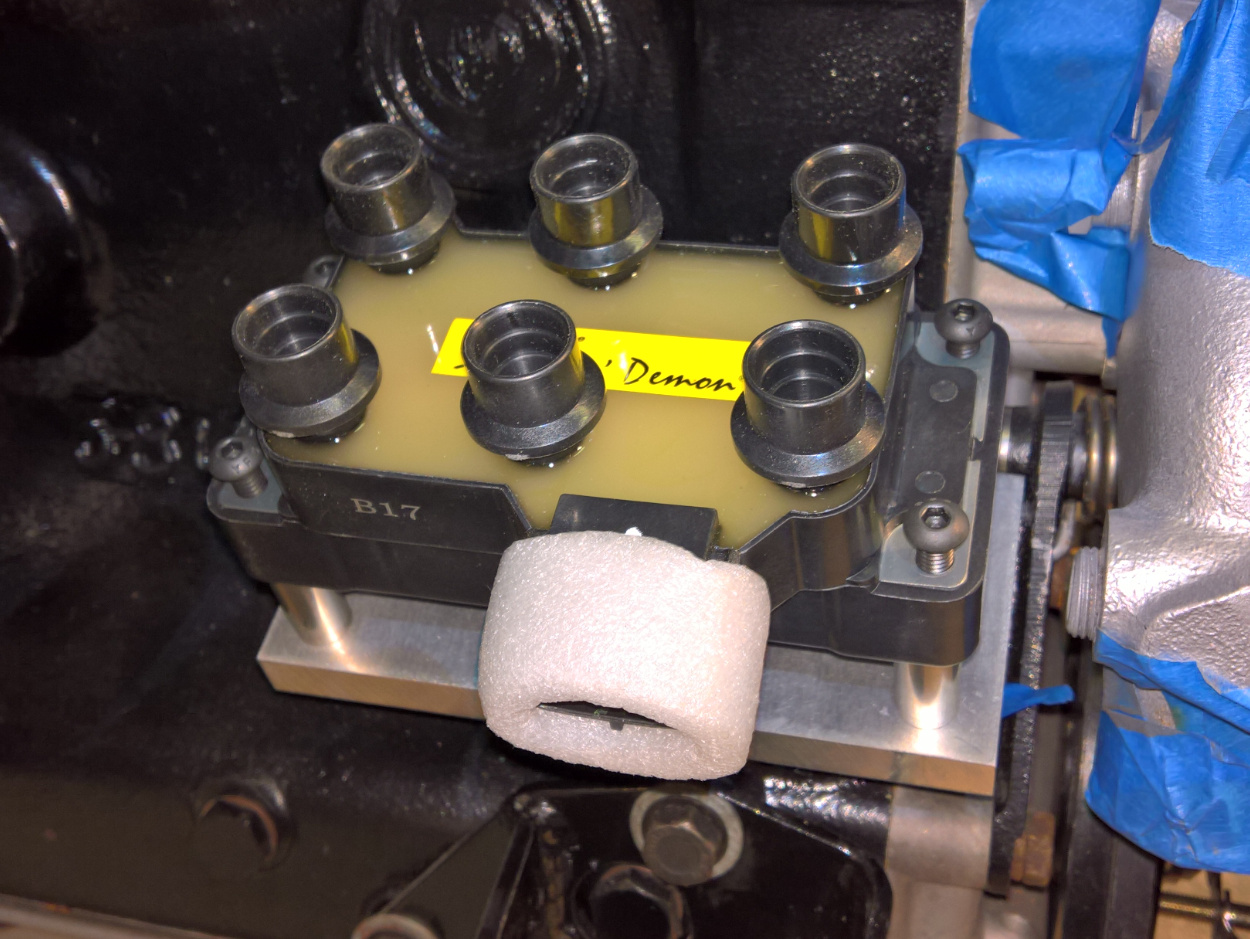
The coil pack is mounted to a custom made 1/2" aluminum platform with stainless standoffs:

Here with the coil pack:
Engine is running on a test stand…will be another year or so before back on the road. Overall EDIS retrofit was a fun project and worked without a hitch. I did consider other trigger wheel options, but some of these mount in front of the pulley making belt servicing a bit trickier. The pickup sensor is mounted on a custom made bracket using aluminum angle stock. If I did that again I would have done it slightly different to avoid the stack of washers I have to get the gap correct as well as having the connector protrude rearward instead of forwards towards the fan. The bracket itself bolts to two empty threaded holes in the block just above the left engine mount.
No experience with Megasquirt…I used the Megajolt setup from Autosport Labs here in Seattle.
Tom
1 Like
Theo et al.
It is reassuring that “tapped” did the same as I planned for the timing wheel.
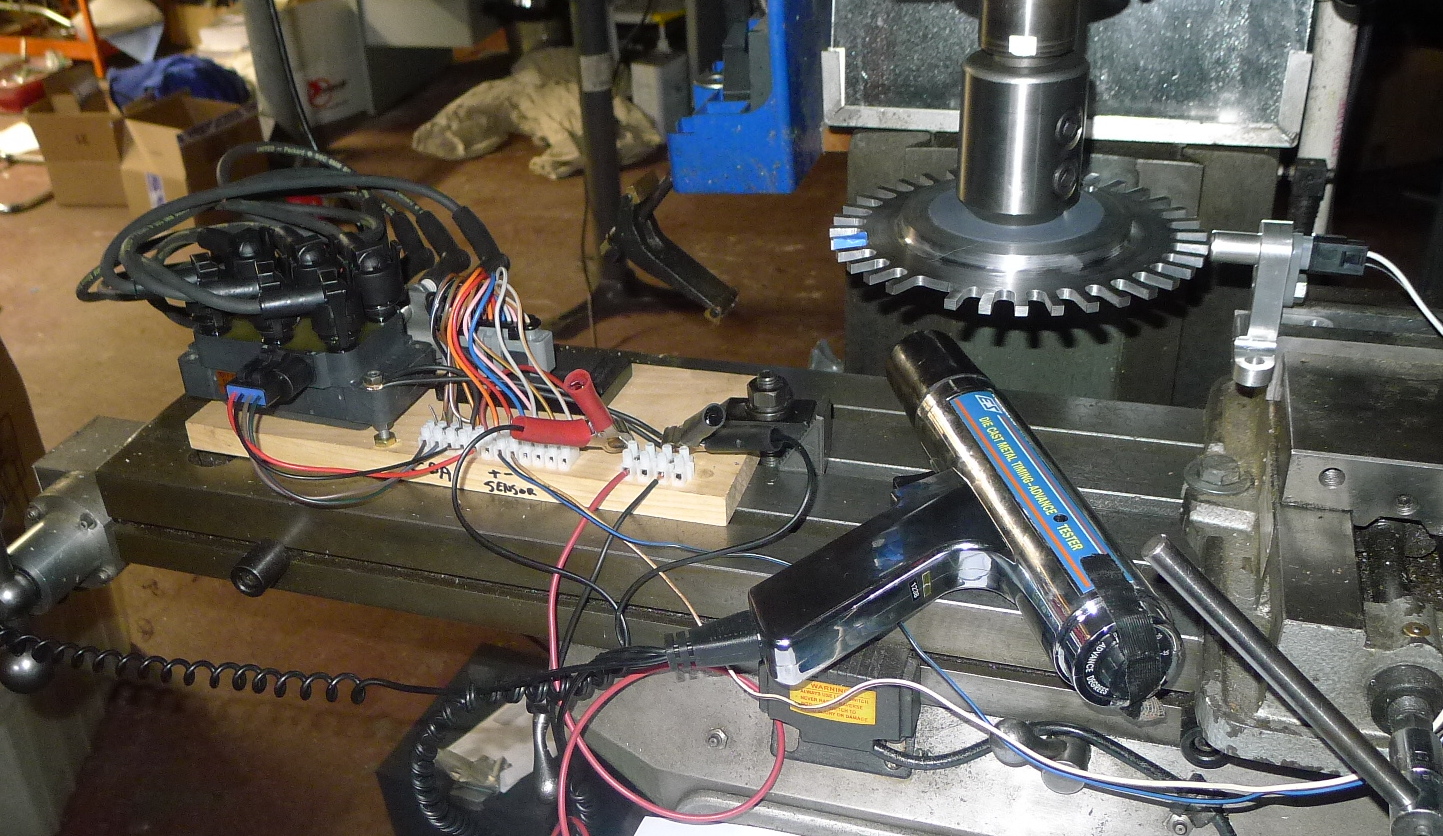
Thanks to Rockauto delivering the parts very quickly, I have now built up a test breadboard and started running it.
The breadboard was constructed to check the components out prior to fitting in the car.
Note that the only EDIS 12 pin connector available was for an EDIS8. To make it fit an EDIS6 the connector must have its two side index pieces removed. This was done with a ¼” endmill about 1.5” long. The correct orientation is shown by the engagement of the holding clip.
All parts were fitted except for the Megajolt which I am awaiting. Therefore the set up will only run in the limp home mode for now = 10° BTDC.
The timing wheel was fitted to a vertical mill whose speed can be adjusted from 0 – 2200rpm.
The initial tests were very gratifying. The sparks started at only 45 rpm and at this slow speed you can easily observe the firing order. A strobe light showed the advance to be about 11° rather than the 10° expected so I will investigate this.
When the Megajolt arrives, I will report on the test results.

Very nice test bed! I may do the same for the Rover.
https://i.ebayimg.com/images/g/G-cAAOSwVLVdYVLR/s-l1600.jpg
This came in the mail yesterday, so I can start building the harness and getting everything ready to go before pulling the accessories apart to install the wheel and sensor.
1 Like
In case anyone out there is consumed with curiosity, I have finished my test runs on my Megajolt system for the Mark 2. Installation in the car will take place in the spring when it comes out of winter storage.
See attached documentInitial tests.pdf (1.9 MB)
1 Like
Followup on this, I don’t see shielded wire on your test stand. Have you sourced shielded wire for the sensors? I ordered some from auto sport labs but the gauge is tiny (like 22-24 gauge) while the shielded wire on the EDIS module is more like 16-18. I’m looking for something similar but not many folks out there seem to have it.
Theo
I did use screened cable for the sensors and the pickup. You can just get a glimpse of it in the first picture as a white cable that is about 3/16 dia.
I had some some very strong military grade screened cable that I removed from some transducers I had. The normal screened cable you buy is way too wimpy in my view.
High grade robust cable is available made by Belden and others but it is usually only available at nose-bleed price in large quantity.
One way you might consider is to buy some braided shielding and then thread individual wires of your choice through the middle of it.
Electriduct 3/8" Tinned Copper Metal Braid Sleeving Flexible EMI RFI Shielding Wire Mesh (0.24" Diameter) - 10 Feet sold my Amazon looks a likely candidate. Or maybe a smaller diameter of the same stuff.
Good luck
Hello Tom,
Can you give more details as to where you purchased the trigger wheel, and what dimension it was.
Cheers
Carl
trigger-wheels.com seems the best / only source for them, in different formats and sizes. I just ordered one for my project on Friday and he said they’re still shipping as usual, but we’ll see if the freight is still flying…
1 Like
You probably already now this but if not… There are complete kits which is bolt on an E-type 4.2 at Webcon with or without coil, leads etc, don’t know if its exactly the same on your engines.
I will use it with Megasquirt and waisted spark, done this before on other cars with great success.
For use on a Mark 2 with the OEM fan, do be aware that on these kits, you cannot fit the timing wheel in front of the fan pulley. There is insufficient clearance between the fan blades and the sensor assembly.
If you use an electric fan maybe OK.
Yes I have an electric fan only, the space is still extremely tight.